Are you looking for more options when mapping curves and creating panelization on polysurfaces and Breps? In this case, ShapeMap plugin, developed by Shaper 3D, is the plugin for you.
In this tutorial we will talk about ShapeMap and how to use it to apply patterns on Breps and polysurfaces, and how to rotate them.
Getting Started with ShapeMap Plugin
To download Shape Map, you need to go to the Chinese website rhino3d.com.cn. The plugin is free but the license needs to be updated every 120 days. Another thing you should know is that it can be installed on only two devices.*UPDATE - you can now also download the plugin from Food for Rhino here.
Once you've installed ShapeMap, you will find videos explaining how to use it on the website.
However, since the videos are in Chinese, we'll simplify everything for you here.

ShapeMap Plugin Components
This plugin has four components: Shape Solver, Shape Map, Map to Shape and Map to Border. The first step is Shape Solver, and the second is Shape Map. Shape Map takes data outputs from Shape Solver.
Next, depending on what you need, you can use Map to Border ot Map to Shape. The data output from ShapeMap is connected with either the Map to Border or Map to Shape data input.

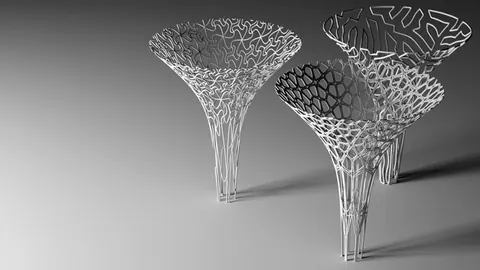
Mapping Curves on PolySurfaces
Firstly, we'll take a SubD or poly surface and use the Brep container to reference it in Grasshopper. You need to plug it into the Shape Input of Shape Solver. If the Brep is working fine, then we'll get some infomation from the data output. Next up, we need to set the finest number. The result will be more acurate the higher the number is.After that, we will add the Shape Map component and connect it with the Shape Solver. For this, we'll need three inputs: reference line, target line and boolean value. We'll set the reference line and define the target line.Then, we will choose to either base the area on the target line, or take it from the original polysurface. Whichever you choose, the next step is to trim the pattern with the unrolled border of Brep. We generate this Brep with Shapemap using Region Intersect component. Once we have trimmed the curve, we'll map it back on the polysurface with Map to Shape.

Rotating the Pattern
In order to rotate the pattern, we need to rotate the orientation plane of the bounding box. We will place the XY plane into the Rotate Plane component. We also need to define the angle of rotation, check degrees and plug it into the bounding box. We'll enable back the Region Intersect component.
You will see how the mapped pattern is rotating as we change the angle.

Mapping Patterns to Borders
To map the patterns to the border, we need to first take two border curves of the polysurface. Afterwards, we will extrude these and reference them inside the curve container. Take both of them, take Map to Border and then unroll the curve. In the output, we get two planar curves. We'll create two separate outputs using List Item.
In the I is curve 1, and in the output +1 is curve 2. These two will be placed in the Tween cruves component in input F. Using the Range component, we can define how many tween curves we want to get, by placing numbers from zero to one.
If it seems weird, we probably need to flip one of these curves. We will extend the tween curves to fill the gaps between the curves and the border. Then we will trim them and and using Trim with the Region component, we will keep the curves inside the borders. Taking the curves from the CI output, we'll first join them, and then flatten the list. We want to place the curves back on the polysurface, so we'll place them inside Map to Shape.
You can use the slider to define the number of tween curves and thus modify the final pattern.

Final Thoughts
Mapping curves and creating panelization on any polysurface or Brep becomes much more accesible with the ShapeMap plugin. By following this tutorial, you'll be able to create intricate patterns and rotate them.Two things you should remember about the ShapeMap plugin is that it can be installed on two devices only, and the license needs to be updated every 120 days. *UPDATE - now, this can be solved by using the version from Food for Rhino as mentioned here.
In the extended version of this tutorial, we have left detailed intructions on the process of downloading and installing the Shape Map plugin, and also on how to map any type of pattern on a polysurface which has multiple holes. You can access this tutorial, as well as all our extended tutorials and project files by supporting us on our Patreon page.
Grasshopper Complete Course
Give your architectural skills a boost with the Grasshopper Complete Course. Get over 50 hours of comprehensive Grasshopper training tailored for architects. Learn to generate and iterate designs faster. Click below for more information and streamline your workflows!