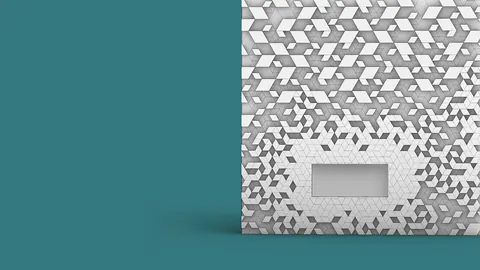
In architecture and design, facades made up of triangular panels can create unique aesthetic effects. With the power of the Grasshopper plugin for Rhino, you can easily generate intricate triangulated facade designs. In this in-depth tutorial, you'll learn step-by-step how to build a parametric model that creates a dynamic, randomized pattern of triangular panels.
Overview
We'll start by building a simple flat triangular facade. Then you'll learn how to align the corner normals of the mesh properly. Next, we'll sort the mesh faces based on their X, Y, and Z coordinates to create the substructure geometry.
Following these steps, you'll be able to generate stunning, complex triangulated facade designs with a high degree of control over the randomness. Let's dive in!
Building the Base Facade
First, create a rectangle as the base facade shape. Set up sliders to control the dimensions.
Extrude the rectangle to give it some depth. Then use the Lunchbox plugin to subdivide the extruded shape into triangular panels. Adjust the number of divisions to get the panel proportions you want.
Convert the panels into a single joined mesh using Weaverbird components. This gives us our base flat triangular facade.

Aligning the Corner Normals
A problem arises with the corner normals of the mesh. The vertical normals are aligned correctly, but the top and bottom corner normals are skewed.
To fix this, isolate the corner vertices based on matching X and Y coordinates with the original rectangle corners. Find the average of the corner normals to get the proper alignment. Replace just the corner normals in the original list while keeping all other normals intact.
Now the mesh has consistent normals across all corners.
Sorting the Faces
To create the substructure, we need to isolate groups of faces along certain axes.First, sort the vertices based on the X coordinate. Group them into branches with the same X value.
Then sort each branch by Y coordinate. Further, subdivide each branch into lists with the same Y.
Finally, sort each sub-branch by Z coordinate.
This results in lists of vertices sorted fully by X, Y, and Z coordinates.
Convert each sorted list into polylines to form the substructure. Connect matching pairs to create the supporting surfaces.
Offset and merge to complete the substructure for the triangulated facade.

Animating the Facade
From here, you can bring the triangulated facade to life. Use the random component to displace the vertices along their normals by differing random amounts. Rebuild the mesh to update.
Changing the random seed morphs the facade into new organic shapes. You now have a fully parametric model for generating endless unique facade designs!

Recap on Triangulated Facade Design
In this tutorial you learned:
- How to create a basic flat triangular facade
- Aligning corner normals properly
- Sorting mesh faces by X, Y, and Z
- Building the substructure from sorted lists
- Animating the facade randomly
With these steps, you can build striking animated facades with Grasshopper. The possibilities are endless for experimenting with different patterns!
This covers the core concepts but there are many more advanced techniques to take your dynamic facades even further. Be sure to check out the extended tutorial for more info.
Let me know if you have any other questions!
Grasshopper Complete Course
Give your architectural skills a boost with the Grasshopper Complete Course. Get over 50 hours of comprehensive Grasshopper training tailored for architects. Learn to generate and iterate designs faster. Click below for more information and streamline your workflows!