Are you looking to create stunning architectural animations using Grasshopper and Vray? Animating your Grasshopper model is easier than you think with the powerful Vray rendering engine. In this guide, we'll walk through a step-by-step tutorial for animating a parametric facade using Vray for Grasshopper.
Overview of Vray for Grasshopper Animation
Vray for Grasshopper provides components that allow you to render animations directly within the Grasshopper environment. The key components are the Vray Camera, Vray Renderer, and Vray Timeline. By connecting these components, you can set up a rendering that will output an animation sequence based on changes to your Grasshopper definition over time.
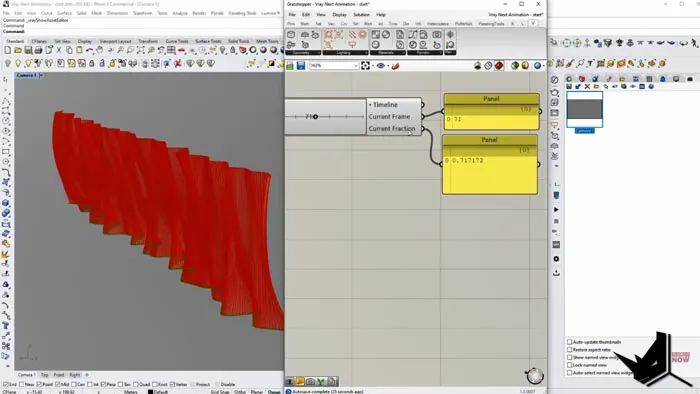
The Vray Timeline generates parameters that control how your model changes frame by frame. The Current Frame output provides the frame number while the Current Fraction output goes from 0 to 1 over the course of each frame. By connecting these to key parameters in your Grasshopper definition, you can animate your model.
Step-by-Step Tutorial for Vray Grasshopper Animation
For this tutorial, we'll start with a Grasshopper definition that has created a parametric facade surface. Our goal will be to animate a wave propagating across one section of this facade over time. Here are the steps:
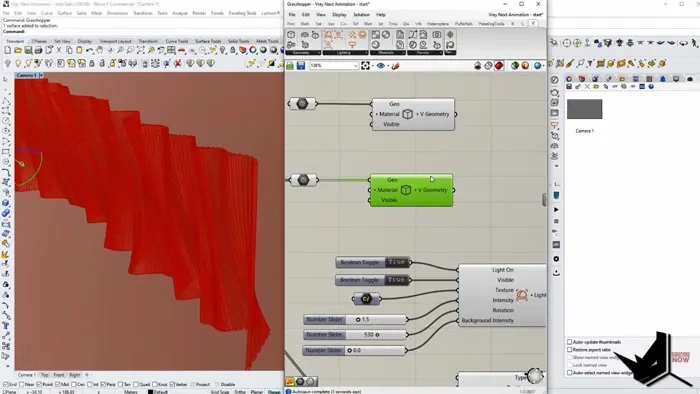
- Set up the Vray components - Add a Vray Camera, Vray Renderer, and Vray Timeline to your Grasshopper canvas. Connect the Camera and Timeline to the Renderer. Extract key parameters from the Renderer for easy access.
- Add Lighting - Use a Vray Light to illuminate the scene. An HDRI environment map works well. Connect it to the Renderer.
- Specify Geometry - Add Vray Geometry components and connect your Grasshopper model outputs to them. This registers the geometry with Vray.
- Assign Materials - Use Vray Material components to set up material properties. Connect to the Renderer.
- Connect the Timeline - Link the Vray Timeline to the parameter driving the Vray Grasshopper animation. Use the Current Fraction to go from 0 to 1.
- Match Frame Count - Set the Timeline Frame Count to match the number of divisions in your animated parameter. This ensures smooth animation.
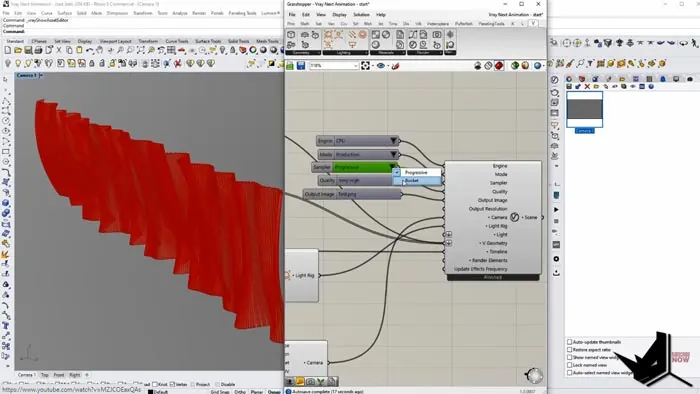
- Render the Animation - Switch the Renderer to Production mode and set the output path. Click Render Animation.
By following these steps you can set up a rendered Vray Grasshopper animation sequence of your Grasshopper model using Vray. The key is linking the Vray Timeline component to drive changes in your model.
Rendering Quality and Performance
For best results, use the Bucket rendering sampler and set the Quality setting to High or Very High. However, for complex scenes, you may need to reduce the quality for better performance. Test rendering a single frame first before kicking off the full Vray Grasshopper animation.
The resolution also impacts render times. Balance size and quality based on how long you are willing to wait. A lower resolution may be acceptable for rough draft animations.
Post-Processing the Vray Grasshopper Animation
The rendered sequence will output a set of individual image files. To compile these into a final animation, bring them into video editing software like Adobe After Effects. Add transitions and camera animation for the finished animated video.
Conclusion
Animating Grasshopper models is straightforward with Vray for Grasshopper. The key is leveraging the Vray Timeline component to drive parametric changes over a sequence of frames. With a render-ready scene setup, you can produce amazing architectural animations with ease directly in Grasshopper.
More on Vray Grasshopper Animation
To see an extended tutorial on animating cameras and compiling the animation in After Effects, check out the full version on Patreon. Unlock access to all extended tutorials and project files by becoming a patron.
Grasshopper Complete Course
Give your architectural skills a boost with the Grasshopper Complete Course. Get over 50 hours of comprehensive Grasshopper training tailored for architects. Learn to generate and iterate designs faster. Click below for more information and streamline your workflows!


