Rhino's robust modeling capabilities make it a great choice for architects and designers looking to create detailed 3D models of buildings and structures. In this tutorial, we'll look at how to use Rhino to model the Flagship Store facade, taking advantage of Rhino's Boolean operations for quick and easy subtraction modeling.
Overview of the Flagship Store Project
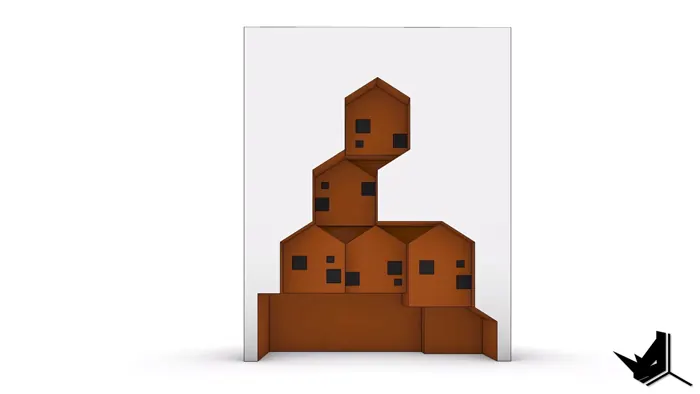
The Flagship Store that we’ll be modeling in this tutorial was designed by Tru Architects and is located in Seoul, South Korea. Named "0914", the design features a distinctive faceted facade with protruding window elements.
To start modeling the flagship store in Rhino, we'll first set up guide curves based on a reference image to outline the overall form. Then, we'll use Rhino's Curve Boolean tools to create subtracted components that make up the building's unique facade. The walkthrough demonstrates simple modeling principles and commands that make quick work of constructing the complex geometry.
Using Guide Curves for Initial Layout
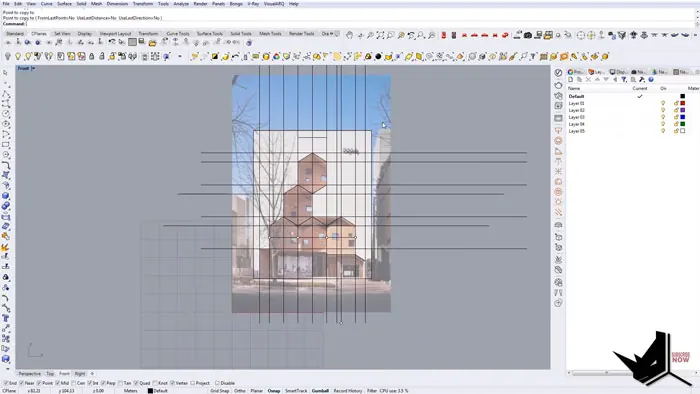
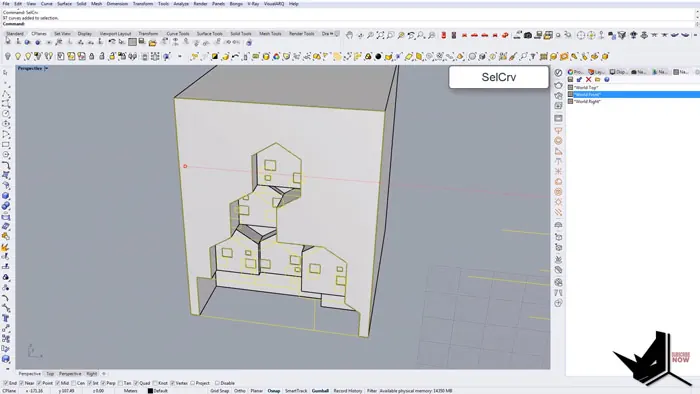
After inserting a reference image, the first step in Flagship store modeling is setting up guide curves that delineate the major divisions on the facade. Axes are created at interval points, mirrored across central axes to lay out the vertical and horizontal divisions. Additional guide curves are added to fully frame out the grid.
While the perspective of the reference image won't align perfectly with the orthographic construction, the guide curves provide important visual cues for the initial facade layout.
Modeling Subtracted Facade Components
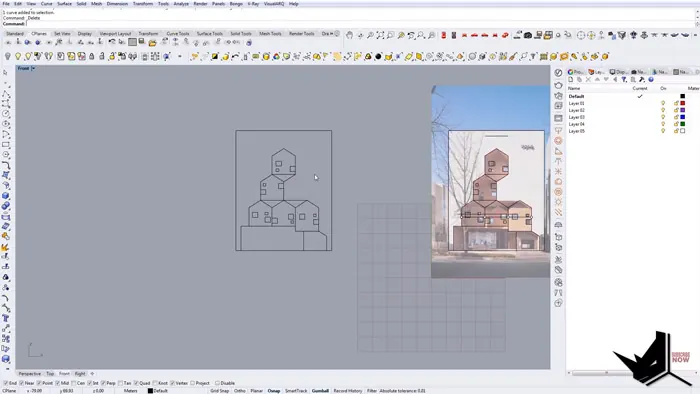
With the guide curves in place, individual facade components can be modeled. Here, polylines trace out the protruding window bays and other geometric extrusions, which will eventually be subtracted from the main surface.
Curve Boolean tools quickly convert the sketched layouts into closed planar curves for the subtractive components. Each major element is created by enclosing the appropriate guide curves.
Subtraction Modeling with Boolean Operations
To bring it all together, a solid cuboid mass stands in for the overall flagship store volume. By extruding the component curves outward and performing a Boolean difference operation, the complex faceted facade starts taking shape.
Iteratively working through the protruding elements, starting with those farthest back, the scene begins resembling the original reference model. Moving methodically back to front builds up the required surface depth and articulation
Adding Window Details
For extra realism, window gaps can be cut into the protruding bays. After isolating and deleting unnecessary curves, the window outlines are projected onto the main surface.
Using Rhino's Split tool with the window curves as cutting objects creates openings wherever they intersect the surface. Further tweaks like inset extrusion and extracting the front surface produces 3D window recesses matching the real-world facade.
Logical Process for Architectural Modeling
By following a logical workflow - laying out guides, creating components, and subtractively assembling from back to front - even complex architectural geometry can be modeled with Rhino's versatile tools. The step-by-step walkthrough demonstrates the intuitive modeling process.
Whether you're an architect, designer, or 3D artist, Rhino's robust Boolean operation capabilities make quick work of subtractive construction techniques for architectural modeling. The Flagship Store modeling example highlights the efficient workflow.
For more tips on architectural modeling with Rhino's powerful tools, be sure to check out more tutorials. And let us know in the comments if you have any requests for future tutorial topics!

Rhino for Architects Course
Give your architectural skillset a major boost with the Rhino for Architects Course. Get over 60 hours of focused training tailored specifically for architects. Master commands and techniques to model, render, and animate architectural visualizations at the highest level. Click below for more information and watch your designs come alive!