Diagonal grid design can create visually striking architecture. However, modeling a seamless diagonal grid in complex geometries can be challenging with traditional CAD software. In this tutorial, we’ll use Grasshopper’s parametric modeling tools to create a seamless diagonal grid design on a hyperboloid surface.
Overview of Diagonal Grid Design
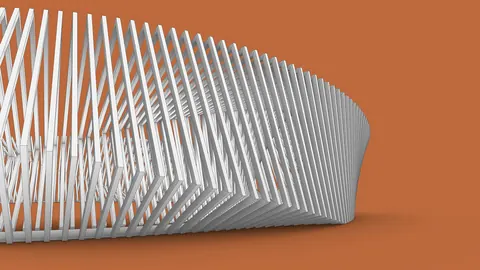
We’ll model the Corporation Street Bridge in Manchester, U.K., designed by Hodder and Partners. This pedestrian bridge has a beautiful diagonal grid facade shaped like a hyperboloid.

To create this complex geometry in Grasshopper, we’ll:
- Model the basic hyperboloid surface
- Divide it into triangular panels
- Create a diagonal grid of lines across the panels
- Offset each panel to create thickness
- Add the structural steel pipes and supports
With this step-by-step tutorial, you’ll learn how Grasshopper’s algorithms and data trees can generate complex designs faster than traditional CAD.
Model the Hyperboloid Surface
First, we’ll model the basic surface. We create a curved line and divide it into points. The point density is higher at the center and lower at the ends, based on the reference image.
To create this point distribution, we:
- Input a simple straight-line
- Evaluate it into a curved line
- Remap the parameter with a Graph Mapper curve
- Connect it to Points on Curve to generate the points
Next, we create circles on each point using Circle CNR. We connect the point locations to the circle centers. The circle planes are based on the curve tangent vectors.
To create the right circle sizes, we:
- Map a Graph Mapper curve from 0-1
- Remap the values from 0-1 to the min/max radii
- Connect the remapped values to the circle radii
This gives us larger circles on the ends and smaller in the center.
Finally, we turn the circles into a surface with Region Union.

Divide into Triangular Panels
Now we need to divide the surface into triangular panels.
We extract the points from each branch of the data tree. Then we
- Connect every other point from adjacent branches
- Offset the indices to create diagonals in both directions
- Use Rule Surfaces to create each panel
This divides the surface into triangular panels with diagonal edges.
Offset the Panels
To create thickness, we offset each triangular panel inwards slightly.
First we:
- Deconstruct the surface into faces
- Extract the face boundaries
- Unify their orientations
Then we:
- Offset each boundary curve
- Create ruled surfaces between offset and original
- Join into a solid Brep
This adds thickness while maintaining the diagonal grid design.

Add Structural Pipes
The bridge has a steel pipe structure under the glass facade.
We create it with a simpler diagonal grid using fewer divisions. This avoids overlapping with the glass panels.
To generate the pipes:
- Remake the circles with half as many divisions
- Offset the point indices to create diagonals
- Generate pipes along the diagonal lines
Finally, we add the bridge surface and supports.

Diagonal Grid Design - Conclusion
With Grasshopper’s algorithms, we created a complex diagonal grid design on a double-curved surface. This would be extremely difficult to model precisely in traditional CAD software.
The parametric workflow also lets us easily edit and iterate on the design. We can tweak the point distributions, line directions, or panel offsets to create new diagonal patterns.
To learn more advanced parametric techniques, check out the Rhino for Architects program. You’ll master organic modeling, rendering, and more with their structured video courses.
So if you need to model complex diagonal grids, Grasshopper provides powerful tools to create and iterate quickly. The visual programming workflow abstracts away the geometric complexity, letting you focus on high-level design.
Grasshopper Complete Course
Give your architectural skills a boost with the Grasshopper Complete Course. Get over 50 hours of comprehensive Grasshopper training tailored for architects. Learn to generate and iterate designs faster. Click below for more information and streamline your workflows!