In the ever-evolving sphere of architectural design, where innovative structures continually emerge, the Spiraling Observation Tower by EFFEKT Architects is a testament to modern ingenuity. To illuminate the intricate process behind modeling such an impressive edifice using Rhino, we've created this detailed guide.
Leveraging Rhino and Grasshopper for the Spiraling Observation Tower
Setting the Stage
Before diving into the Rhino interface, it is pivotal to import the necessary cross-sections that will facilitate the modeling process. The initial step involves creating a picture frame in the right view using the imported section. This stage sets the ground for the meticulous journey of molding the Spiraling Observation Tower from a mere conceptual representation.

Crafting the Cylinder Base
Embarking on this exciting journey, the first step is to craft a central cylinder, the backbone of our tower. Drawing a point in the center acts as a prologue to introducing a cylinder to this Rhino space, initiating a journey of turning a concept into a magnificent 3D structure.
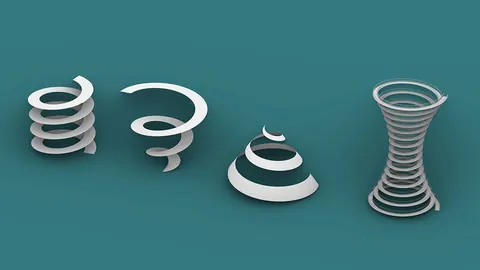
Introducing Helix: Bringing the Spiral to Life
The "helix" command comes into play here, wrapping the cylinder with a helix structure, and bringing it closer to the envisioned spiraling design. This step involves intricate adjustments, including setting the correct number of turns, and perfectly aligning the start and end points, thereby laying a firm foundation.

Sculpting with the Cage Edit Tool
The cage edit tool stands as a critical feature in Rhino, aiding designers in modifying structures effortlessly. In modeling the Spiraling Observation Tower, the tool permits the manipulation of the tower's form, providing an avenue to sculpt the building to its desired shape, and setting the stage for further enhancements.
Achieving the Perfect Curve with Rebuild Command
The rebuild command comes into play post-cage edit, allowing for the surface to be refined to perfection. This step ensures flawless curvature and getting the model ready for additional details.

The Grasshopper Magic
Transitioning to Grasshopper, the tutorial leads you into creating the external support columns that bring stability and aesthetic value to the model. This step makes the process straightforward by deconstructing the prep, extracting necessary edges, and using them in the later stages.
Dividing and Conquering
With Grasshopper still in action, we will go on with dividing curves, setting segments, and eventually linking top and bottom divisions. These actions set the stage for rotations, which bring the tower closer to its final form.
Rotation and Angulation
The process undergoes a pinnacle point here where rotation comes into focus. It is here that the Spiraling Observation Tower begins to take a more defined shape. Through precise rotations and working with angles, the structure attains its spiraling characteristic, defining its iconic look.

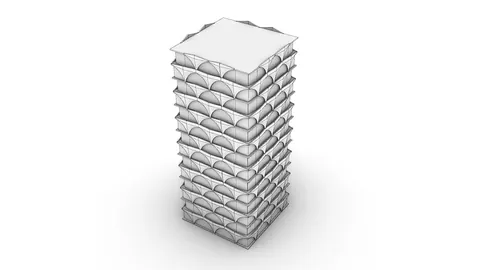
Realizing the Columns
With the spirals set in place, what follows is the realization of support columns, giving us a skeleton that is both strong and visually captivating. Grasshopper continues to be the hero in this stage, aiding in creating perfectly aligned and robust columns that form the spiraling veins of the tower.
Polishing the Details
As we approach the finale, it is time to polish the details, incorporating aspects like thickness, surfaces, and giving our model a finesse. This stage involves creating pipes, setting the appropriate radius, and finally introducing the cap command to attain a finished and polished look.

The Finishing Touches
Before we reach the end of this architectural journey, let’s dive into the finer details. We’ll create cross-sections at various levels to achieve a smoother model of the tower. The “Sweep 2” command ensures a cleaner geometry, establishing an aesthetic that is both pleasing and structurally sound.
The Grand Reveal
As we get closer to the end, it is time to unhide all components, bringing together each element to witness the final look of the Tower. The final touches include creating surfaces and offsets, and perfecting the top with a masterful surface, bringing the project to its completion, ready to awe its audience.

Conclusion
This comprehensive guide walks you through the meticulous process of modeling a Spiraling Observation Tower using Rhino and Grasshopper. Through a detailed breakdown of each step, you are now equipped with the knowledge to craft it on your own and level up your skills in the process.

Rhino for Architects Course
Give your architectural skillset a major boost with the Rhino for Architects Course. Get over 60 hours of focused training tailored specifically for architects. Master commands and techniques to model, render, and animate architectural visualizations at the highest level. Click below for more information and watch your designs come alive!