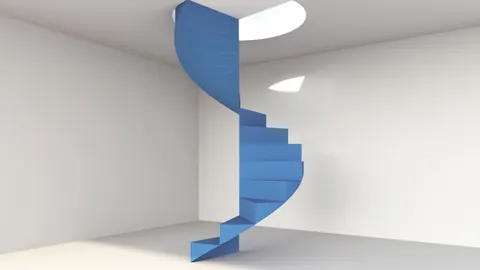
When working on architectural projects, the ability to transform 2D drawings into 3D models can be crucial. For those who use Rhino's Grasshopper, a unique method allows users to create a 3D stair model from a 2D stairs from CAD drawing with just a single click. This blog post will walk you through the process of and ensure that you get the best out of your design.
Introduction: The Beauty of Grasshopper in Rhino
Grasshopper in Rhino offers a plethora of design capabilities. One of its impressive features is converting 2D drawings into 3D models. This tutorial will delve deep into creating a Grasshopper definition for stairs from CAD.
Importing Stairs from CAD
To begin, ensure that your drawing of the stairs from CAD is imported into Rhino and that all lines are on the same plane. The lines don't need to be polylines, so there's no fuss there.

Using the Heteroptera Plugin
You'll need the Heteroptera plugin, which is available for free. Once you have installed the plugin, you'll use the component named "Geometric Region." When connected with your stair drawing, it generates closed polylines for each region. As a result, we have created a surface from these polylines.

Sorting and Positioning Your Surfaces
By using the "Sort Along Curve" component, you can ensure each stair surface is in its correct order. To elevate your design, consider moving each step to create the layers of the staircase. Remember, if your staircase has, for instance, 17 steps and spans three meters, you'll need to adjust the height of each step accordingly.
Creating the Steps
After you've positioned your steps, the next task is giving them depth. Extruding them by the value of 0.05, you will get a staircase with a realistic thickness. But don't stop there; make sure to fill in the gaps between steps for a cohesive look.

Stairs from CAD - Perfecting the Design
With your steps in place, it's time to finesse the design. Extract the front face of each step and extrude it in the opposite direction for a smooth finish. This tactic hides any connection lines and presents a seamless appearance.
Reversing the Stairs
For those who require their staircase in the opposite direction, it's as easy as using the "Mirror" function. Identify the center point of your staircase's bounding box, create the appropriate plane, and mirror your steps.

In Conclusion
Converting stairs from CAD from a 2D drawing to a 3D model is simple with Grasshopper in Rhino. Not only does it save time, but it also ensures precision in architectural and design projects.
Grasshopper Complete Course
Give your architectural skills a boost with the Grasshopper Complete Course. Get over 50 hours of comprehensive Grasshopper training tailored for architects. Learn to generate and iterate designs faster. Click below for more information and streamline your workflows!