In the architecture industry, an efficient tool is always helpful, and might well be a game-changer. In this post, we're going to talk about a versatile tool with impressive capabilities - Cadmapper.
We can use this tool to import terrain with existing buildings from any location in the world.
We will dive into the intricacies of Cadmapper to Rhino workflow and show how we can use it to optimize our architectural projects.
Whether you are preparing a site analysis, building a competition entry, or simply need a quick context model for a client presentation, CadMapper saves hours of manual modeling. Instead of tracing satellite images or building terrain from scratch, you get a ready-made 3D base with buildings, roads, topography, and water bodies that you can refine inside Rhino.
In this tutorial, we will cover every step of the CadMapper to Rhino workflow: creating an account, selecting your site area, downloading the file, importing it into Rhino, organizing layers, working with topography, styling your model for presentations, and exporting the final result. By the end, you will have a complete site model ready for your next project.
Cadmapper Possibilities
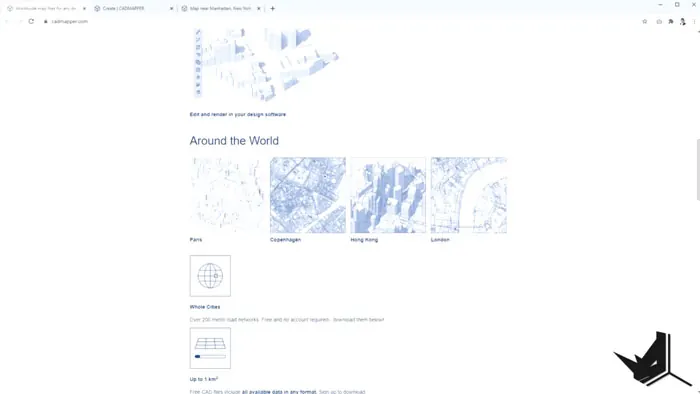
As I have noted above, Cadmapper offers the possibilities to access CAD files for any location on the planet. By integrating data from NASA, USGS and Open Street Map, Cadmapper helps the creation of 3D files.
This is a valuable resources for professionals. Furthermore, it is accessible to everyone as the maps up to one square kilometer are free to use.
CadMapper pulls its data from three main sources. NASA's Shuttle Radar Topography Mission (SRTM) provides elevation data for terrain contours. The United States Geological Survey (USGS) supplies additional geographic datasets. OpenStreetMap contributes building footprints, road networks, railways, parks, and water features. Together, these sources create a comprehensive 3D snapshot of any location.
Keep in mind that the accuracy of the data depends on the OpenStreetMap coverage for your chosen area. Major cities like New York, London, and Tokyo have highly detailed building footprints, while smaller towns or rural areas may have less complete data. Always verify the output against satellite imagery or a site visit before using it for a final presentation.
CadMapper File Formats and Pricing
CadMapper supports multiple export formats to fit different workflows. You can download files as Rhino 3DM, SketchUp SKP, AutoCAD DWG, DXF, or Adobe Illustrator AI. For architects working in Rhino, the native 3DM format is the best choice because it preserves layers, 3D geometry, and metadata without any conversion issues.
The free tier lets you download one map per month covering up to one square kilometer. For larger areas or more frequent downloads, CadMapper offers paid plans that unlock bigger coverage areas and higher download limits. For most academic projects or small site analyses, the free tier is more than enough to get started.
If you need data beyond what CadMapper provides, you can supplement it with other free sources. For example, you can download high-resolution terrain data from OpenTopography, or grab detailed building footprints from your local city GIS portal. These datasets can be imported into Rhino alongside your CadMapper file to create an even more detailed site model.
How Does CAD Mapper work?
Firstly, go to the Cadmapper website and sign up for a free account. It's a very straightforward process from there. Simply define the area you're interested in, get your file and use it in the software.
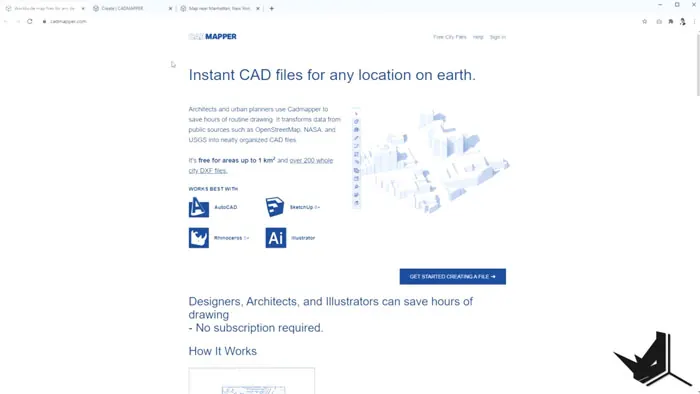
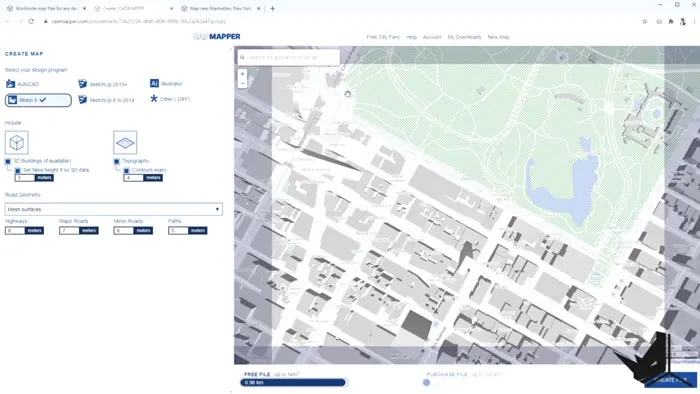
One of the awesome features is the possibility to integrate Cadmapper to Rhino. This allows us to export open street data of any city into Rhino. After you sign in, you can choose the format in which you want to export the file - it can be either Rhino, Sketchup, Illustrator, DXF file or AutoCAD, whichever you prefer.
Additionally, the level of details we're able to control is stunning. For instance, if you choose to include topography in your file, you can play around with the width of major and minor roads, highways and even paths.
Getting Started With Cadmapper
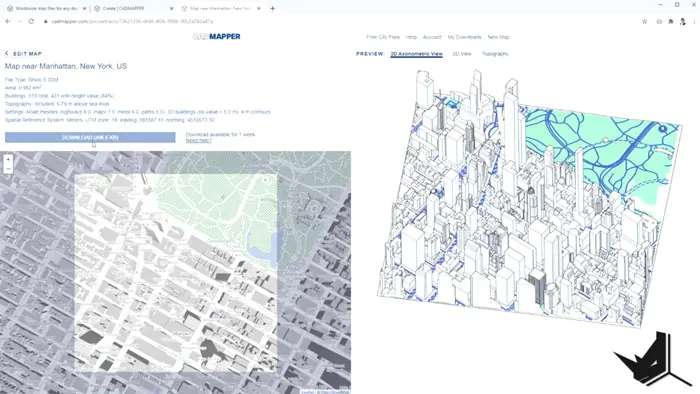
Now we'll walk you through the process of using a map. In our case, we decided to go with Manhattan, New York. After we define the area, we need to click on "create file". This way we will get our map. We can further adjust the file, if for example we don't want it to be square.
Once we do all the required changes, we'll click on "preview file" to see what it looks like and then download it.
A few tips when selecting your area: start with a slightly larger boundary than you need, because you can always trim the model in Rhino later. If your site spans more than one square kilometer, consider downloading two overlapping sections and aligning them manually using shared reference points like road intersections or building corners.
Before downloading, review the file settings carefully. You can toggle topography, buildings, roads, and water features on or off. Disabling elements you do not need keeps the file size smaller and makes it easier to work with in Rhino.
Using the File in Rhino
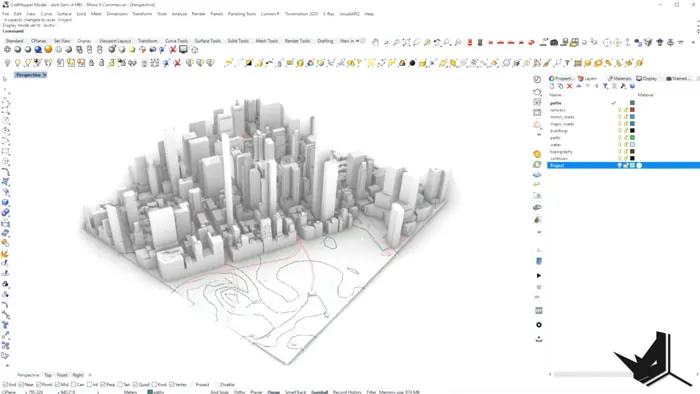
After we download the file, we need to import it into Rhino. You will notice that the layers are already applied. The layers include all the elements - major and minor roads, paths, railways, parks, water, topography and its contours.
If we want to change the look of the overall model, we can adjust the appearance of each layer as necessary.
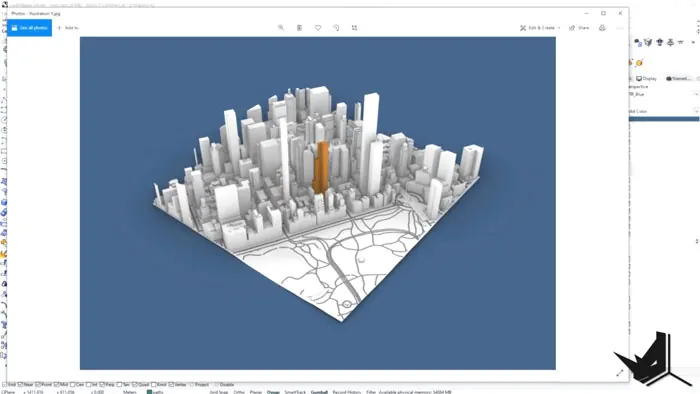
For instance, if your project involves a particular building, you can select the areas of the building, then group them and create a new layer for the project.
Before you start modifying the model, double-check your Rhino units. CadMapper files typically export in meters. If your project template uses millimeters or feet, you may need to scale the imported geometry. Use the Scale command with the appropriate factor (for example, 1000 for meters to millimeters) or change your document units under File > Properties > Units before importing.
It is also a good idea to check the model orientation. CadMapper aligns the map with geographic north, which may differ from your project north. Use the Rotate command to align the model with your site plan if needed.

Understanding CadMapper Layers in Rhino
When you open the CadMapper file in Rhino, you will see a well-organized layer structure. Each layer corresponds to a different type of geographic data:
- Buildings: Extruded building footprints based on OpenStreetMap height data. Heights may vary in accuracy depending on the city.
- Major Roads and Minor Roads: Road surfaces as flat curves or surfaces, with widths proportional to the actual road size.
- Paths and Railways: Smaller circulation routes and rail lines.
- Parks and Water: Green areas and water bodies as closed curves or surfaces.
- Topography: Contour lines representing elevation changes across the site.
You can rename, recolor, or reorganize these layers to match your project's layer standards. For instance, many architects move the project building to its own dedicated layer and assign it a distinct color so it stands out against the context.
Working with Topography Data
One of the most useful features of CadMapper is the topography data. The contour lines you receive can be turned into a 3D terrain mesh using Rhino's Patch command. Select all the contour curves, run Patch, and adjust the stiffness and span count to get a smooth terrain surface that follows the elevation changes of your site.
If you need more control over the terrain, you can use Grasshopper to create a mesh from the contour points. This approach gives you the flexibility to adjust the resolution of the terrain and add features like cut-and-fill analysis for your site.
For projects on steep terrain, the topography data helps you understand slope angles, drainage patterns, and buildable areas before you even visit the site. Combined with the building footprints, you get a complete picture of the existing conditions.
You can also use the contour data to generate section profiles of your site. Simply draw a line across the terrain contours and use Rhino's Section command to extract a ground profile that you can include in your presentation drawings.
Enhancing Visual Appeal
We can use visual styles to easily create a diagram or a graphical presentation of our model, without modifying the existing file. To do this, we will navigate to Arctic mode, which gives us a clean white aesthetic. Also, we can modify Arctic mode as well, to create a visual style we need.
Another thing we can do is create custom styles. Go to Options and change the display mode. This will allow us to highlight specific parts of the model - project building, for example, by giving it a different color.
Beyond Arctic mode, Rhino offers several other built-in display modes that work well with CadMapper models. Rendered mode lets you assign materials to different layers, giving buildings a concrete look and roads an asphalt texture. Pen mode creates a hand-drawn sketch effect that works great for early-stage presentations.
For more advanced visualization, consider using a rendering plugin like V-Ray for Rhino to create photorealistic images of your site model. A well-rendered CadMapper model with your proposed building inserted into the context can make a powerful impression in a design review or competition submission.
Tips for Working with Large CadMapper Files
CadMapper files for dense urban areas can contain thousands of building objects, which may slow down Rhino on older hardware. Here are a few tips to keep your workflow smooth:
- Hide layers you are not using. If you only need buildings and topography, turn off roads, paths, and railways to reduce the display load.
- Use Block instances. If you have repeated elements, converting them to blocks reduces memory usage significantly.
- Simplify distant geometry. For buildings far from your project site, you can replace detailed footprints with simple box extrusions to keep the file lightweight.
- Save a lightweight version. Before adding your own project geometry, save a clean copy of the CadMapper base as a separate file so you can always return to the original data.
Exporting the File
Once we're happy with the visual style of the model, we can export it for printing. Type "View Capture to File" in the command box.
Set up the resolution of the image, save it and you're done with the export.
For higher quality output, increase the resolution to at least 3000 pixels wide for print-quality images. If you need a transparent background, check the "transparent background" option before saving. This makes it easy to composite the image onto a presentation board in Photoshop or Illustrator.
You can also export the 3D model itself for use in other software. Use File > Export Selected to save specific layers as OBJ, FBX, or STL files for use in rendering engines like Lumion, Twinmotion, or Enscape. This is particularly useful when you want to create animated walkthroughs of your project within its real-world context.
Final Thoughts
Cadmapper simplifies the design process, and hence it is an invaluable and efficient tool for architects. With the ability to use Cadmapper to Rhino workflow, it is definitely worth exploring.
If you want to learn more and dive into in-depth tutorials regarding CadMapper, Rhino, and site modeling, check out the Rhino for Architects Course. The course covers everything from basic Rhino commands to advanced modeling, rendering, and presentation techniques that will take your architectural projects to the next level.
CadMapper is especially valuable for architecture students who need quick context models for studio projects, and for professionals preparing competition entries where speed and visual impact matter. Combined with Rhino's powerful modeling and rendering tools, you can go from an empty canvas to a complete site model with your proposed building in just a few hours.
Related Tutorials
If you found this CadMapper tutorial helpful, check out these related guides:
- Kangaroo Grasshopper Plugin: Learn how to create dynamic, physics-based designs in Grasshopper
- V-Ray 3D Section in Rhino: Create stunning sectional renderings of your models
- Architectural Model Making: A complete guide to building physical models of your designs
- Free 3D Models for Architecture: Download ready-made 3D models to add context to your projects

Rhino for Architects Course
Give your architectural skillset a major boost with the Rhino for Architects Course. Get over 60 hours of focused training tailored specifically for architects. Master commands and techniques to model, render, and animate architectural visualizations at the highest level. Click below for more information and watch your designs come alive!