Clay axonometric diagram with Rhino can effectively communicate intricate spatial relationships and construction details. Given that, they're a powerful tool when it comes to architectural presentations.
We've created this tutorial with that in mind, so you can expect to see a step-by-step guide on how to create a clay axonometric diagram with Rhino. You will learn how to create not only complex, but also visually engaging diagrams, in order to impress your colleagues and clients.
Setting up the Rhino File
Firstly, we are going to set up our Rhino file. This means we need to import our 3D model into Rhino. What must be remembered is to organize the model into layers in accordance with the building components that we're going to isolate in our clay axonometric diagram.
In order to isolate specific elements of our model, we will assign objects to layers.

Setting Up the Lighting
After we organize the model, we want to make sure that we've got good lighting. In our case, the first step will be to create the dome light. The reason we choose the dome light is because it has a more subtle effect on the shadow, as opposed to directional lights. Using HDRI images with cloudy weather gives the subtle effect we wished to achieve in this example.

Setting up the Camera and Rendering in Vray
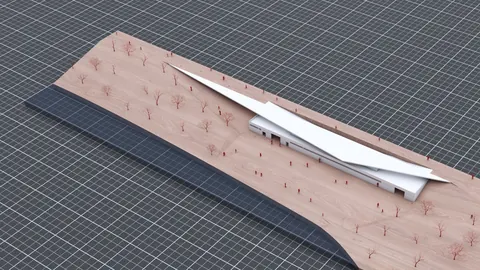
Now that we've set up the model, we will need to take care of the camera in Rhino, so that we can create an isometric view. The first step is to switch to the "Parallel" projection mode. Secondly, we need to choose the appropriate camera angle. Once we have that ready, we will configure the rendering settings accordingly in Vray.

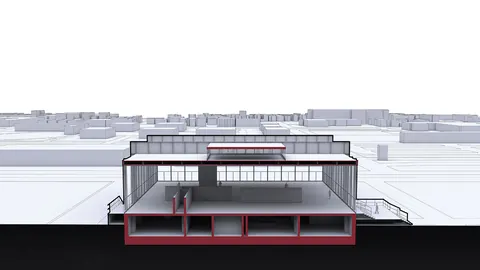
Next up is creating a section cut through our model. For that purpose, we will use the Clipping Plane option in Vray. In case we have objects that we don't want to clip, then we can use the option Exclude. You can find this option located in the Vray toolbar.

Finally, we will render the scene and save the image. We'll be using it in Photoshop afterwards.
Combining the Images in Photoshop
To combine the images in Photoshop, we need to import the rendered images. Keep in mind that we also need to include the object ID mask that we created in Vray prior to this step. Using the object ID mask, we will create selections for the top and bottom parts of clay axonometric diagram. With this, we will able to control the opacity of each individual component.
Adjust the opacity of the top image, and overlap the images in order to reveal the bottom image. It will be placed beneath the top one. Consequently, we will get a sense of depth, which will result in a visually engaging axonometric diagram.

Adding Dash Lines and Adjusting Layers in Photoshop
If we're looking to enhance our diagram futher, we can add dash lines to it. The dash lines will indicate the exploded building components. Using the Pen tool in Photoshop, we will create the lines. There are several settings that we can adjust in relation to the lines. These are the thickness, dash and gap settings. Position the lines according to the movement of each component in our exploded view.
Previously we created the masks, which we are now going to use to control the visibility of the dash lines. We will create separate layer group for the right and left side of the axonometric diagram.
To achieve a more subtle effect, we can adjust the opacity of the lines as well. This will enhance the visual depth of the diagram.

Final Adjustments and Presentation
The final step is applying the adjustments layers to our diagram. These will fine-tune the brightness, contrast, color balance, as well as the levels. In addition, this will unify the overall look of the diagram, making it more visually appealing.

Final Thoughts
Following the steps highlighted in this guide, you will create amazing isometric diagrams. As a result, you'll be able to present your architectural projects in a unique and appealing manner. With the power of not only Rhino and Vray, but Photoshop as well, you can present the complex spatial relationships of your project with ease.

Rhino for Architects Course
Give your architectural skillset a major boost with the Rhino for Architects Course. Get over 60 hours of focused training tailored specifically for architects. Master commands and techniques to model, render, and animate architectural visualizations at the highest level. Click below for more information and watch your designs come alive!