Creating architectural models with unique and eye-catching textures can be challenging. However, with the right techniques, you can easily model complex surfaces like crinkled walls in Rhino. In this tutorial, we will show you a step-by-step process of modeling the crinkled wall effect in Rhino.
Overview
The basic process involves:
- Creating polygon surfaces with random vertices in Rhino
- Exporting the polygons as STL meshes
- Importing them into MeshLab and retriangulating
- Reducing the number of faces to create crinkles
- Exporting the lower poly meshes back to Rhino
- Converting them into polysurfaces
- Rendering the model
Modeling a Crinkled Wall: Process
Here is the detailed process for modeling a crinkled wall in Rhino:
1. Model Random Polygons in Rhino
First, create several polygon surfaces in Rhino with different densities - 5x5, 10x10 divisions. Make sure to move the vertices randomly in all directions to create an irregular shape. This randomness is important for achieving the crinkled effect later.

2. Export the Polygons as STL
Once done, select each polygon and export it individually as an STL file. Keep the export settings at default.
3. Import STLs into MeshLab
Now launch MeshLab and import the STL files you exported from Rhino.
4. Retriangulate and Reduce Faces
Under Filters, select Remeshing, Simplification, Reconstruction, and then Quadric Edge Collapse Decimation. Start with a high target face count and keep reducing it to get more crinkles. For example, reduce the faces from 50,000 to just 100.
5. Export Lower Poly Meshes
When you're satisfied with the amount of crinkling, export each low poly mesh back out of MeshLab.

6. Convert Meshes to Polysurfaces
In Rhino, import the low poly STL meshes back. Then under Mesh Tools, select each mesh and use "Polysurface from Mesh" to convert them into polysurfaces.
7. Render the Model
Now you can render the polysurfaces to see the crinkled effect. Experiment with different starting polygons and retriangulation settings to achieve your desired look and feel.
Results
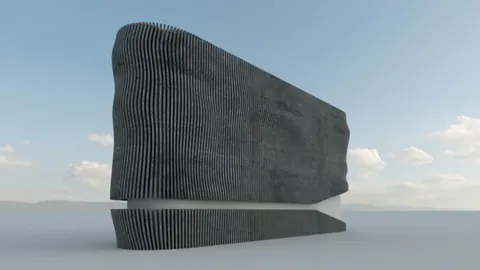
With this easy process, you can add unique crinkled textures to your architectural models in Rhino. The example below shows a rendered wall with a crimpled effect achieved using this technique:

The retriangulation and polygon reduction is the key. Start with dense meshes and keep lowering the face counts until you get the desired level of crinkling distortions.
Conclusion
Modeling irregular crinkled walls greatly expands the options for creating stunning architectural visualizations. The method outlined above provides an easy way to achieve this crinkled effect by combining Rhino and MeshLab.
With just a few steps you can turn a flat polygon into a wavy, wrinkled facade. Experiment with different starting meshes and retriangulation settings to find the look you want.
So next time you need to add some "wrinkles" to your 3D models and renders, give this technique a try!

Rhino for Architects Course
Give your architectural skillset a major boost with the Rhino for Architects Course. Get over 60 hours of focused training tailored specifically for architects. Master commands and techniques to model, render, and animate architectural visualizations at the highest level. Click below for more information and watch your designs come alive!