Modeling stairs in Rhino can seem daunting, but it doesn't have to be. With the right techniques, you can model stunning stairs in no time. In this blog post, we'll walk through a step-by-step tutorial on modeling stairs in Rhino.
Modeling Stairs: Overview
To model stairs, it’s necessary to pay attention to detail and utilize Rhino's array of tools. We'll be covering how to:
- Import a reference image
- Create the steel frame
- Model a single step
- Duplicate the steps
- Add railings
- Create a simple environment
With the right workflow, you can model even complex stairs efficiently in Rhino. Let's get started!
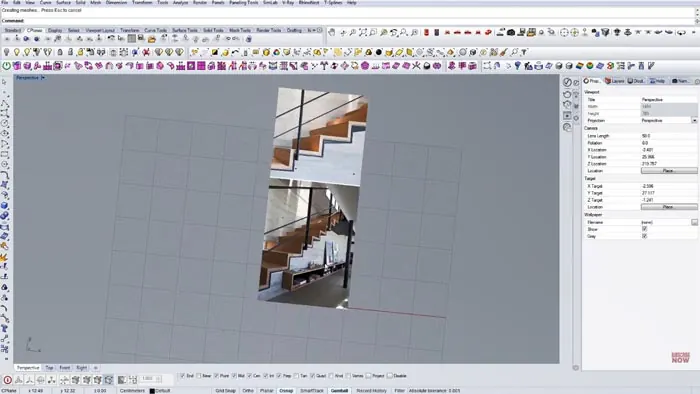
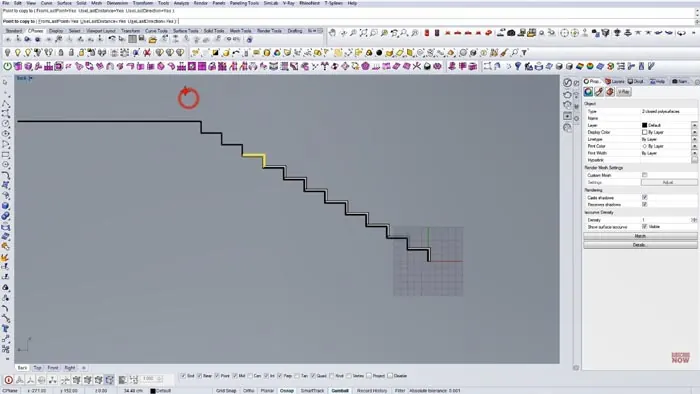
Step 1: Import the Reference Image
Having a reference image is crucial for modeling stairs accurately. Start by importing the image into Rhino and positioning it orthogonally using the Shift key. This lets you model while clearly seeing the stairs.
Step 2: Model the Steel Frame
The steel frame is the base of the stairs. Draw a polyline using increments of 17cm and 30cm for the step height and depth. Copy this line 12 times using Rhino's array tools. Join all the lines into one curve and offset by 1cm to create thickness.
Extend the frame, then turn the 2D lines into a surface using the PlanarSrf command. Delete curves and orient the surface vertically using rotation handles. The frame is complete!
Step 3: Modeling a Single Step
Now model one step that can be copied. Offset edges and use commands like DupEdge and CurveBoolean to create the step profile. Pay attention to details like adding small kinks.
Create the 3D step using surfaces and polysurfaces. Use commands like Extrude Curve and Cap to finish the step.
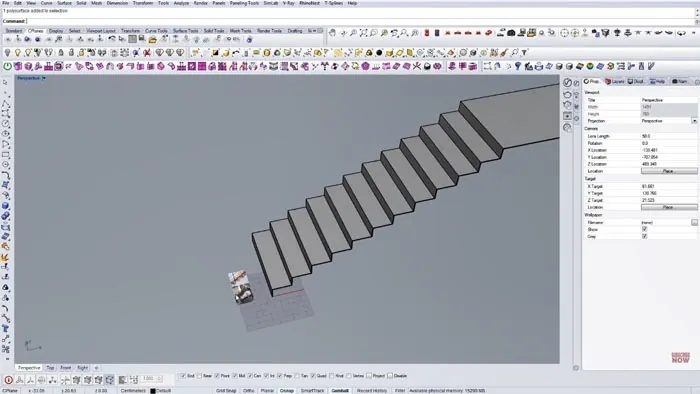
Step 4: Duplicate the Steps
Modify the first two steps to match the reference. Group the steps and copy them into position down the frame using the Copy command.
Trim away excess surfaces and you have stairs!
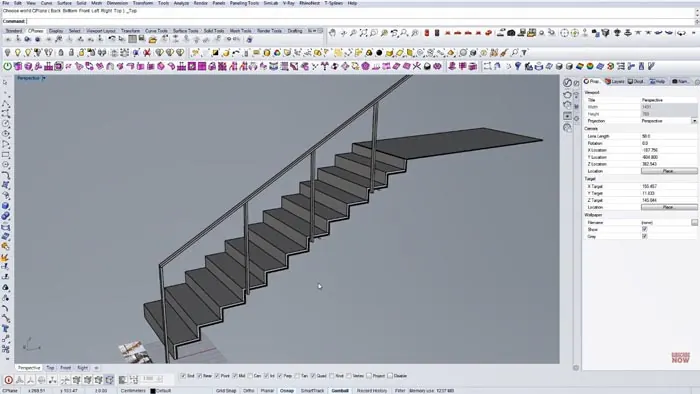
Step 5: Add Railings
The railings start with a simple rectangle. Copy vertical bars into place and draw guides to model the bars. Use offsets, trimming, and polysurface tools to finish the railings.
Step 6: Build a Simple Environment
Add walls, floors, and other elements around the stairs to create an environment. Use rendering to see the final realistic image.
And that's it! The stairs are complete.
With the techniques covered here, you can model all kinds of stairs efficiently in Rhino. The key is using reference images and Rhino's powerful modeling tools like surfaces, polysurfaces, and arrays.
Let me know if you have any other questions about modeling stairs or using Rhino in general. I'm always happy to help explain techniques so you can level up your 3D modeling skills. Get in touch in the comments below!
Rhino for Architects Course
Give your architectural skillset a major boost with the Rhino for Architects Course. Get over 60 hours of focused training tailored specifically for architects. Master commands and techniques to model, render, and animate architectural visualizations at the highest level. Click below for more information and watch your designs come alive!