Modeling a shape that looks good on screen is one thing. Turning that same shape into flat parts you can cut, number and assemble is another, and that second half is where most projects stall. The geometry has to be flat, the parts have to be labeled before they lose their place, and everything has to fit on the sheets your laser cutter takes.
This guide walks through that path for Rhino laser cutting, from a 3D model to sheets ready for the cutter. The worked example is the organic table base from our November workshop, From Organic Shape to Fabrication, where Lazar Djuric takes 12 lines to 240 parts nested for laser cutting in one Grasshopper definition.
Checked in Rhino 8 in November 2026. The workshop definition is built in Rhino 8 with Grasshopper.
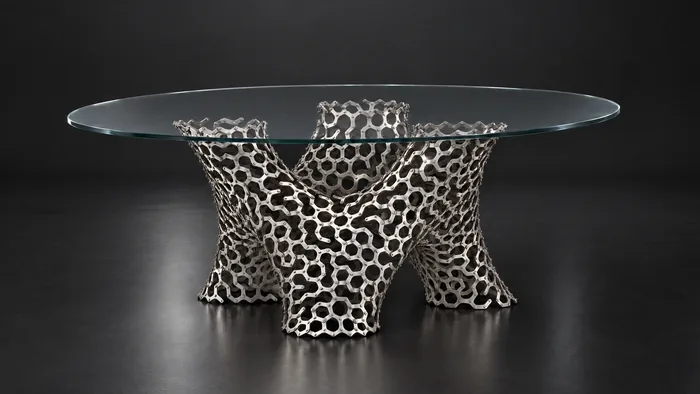
The table base from Workshop #28, built from 240 laser-cut parts. Rendered with RhinoFrame. Image: How to Rhino
Key Takeaways
- A laser cutter only reads flat curves. Everything you send it has to lie on one plane, in real units, with one layer for each operation.
- Pick the flattening tool by curvature. UnrollSrf is exact for surfaces curved in one direction. Smash and Squish only approximate double-curved ones.
- Number the parts before you flatten them. Once 240 parts lie flat, nobody can tell where part 79 goes.
- Nest the parts, then bring the labels along. Nest the closed outlines first and move the numbers with them.
- Cut one test piece before the full batch. It tells you the kerf, the power and the speed for your material.
What a Laser Cutter Needs From Your Rhino File
A laser cutter does not see your model. It reads curves on a flat plane and follows them with a beam. That makes the checklist short, and every item on it causes a failed cut when it is missing.
- Flat curves on one plane. Put every part on the Top construction plane. ProjectToCPlane flattens curves that sit slightly above or below it.
- Real units. Model in millimeters, or set the scale before you export, so a 300 mm part does not arrive as 300 inches.
- Closed outlines for cuts. SelOpenCrv selects every open curve, so you can see at a glance which outlines still have gaps.
- No duplicates. Two curves on top of each other make the laser cut the same line twice and burn the edge. SelDup finds them.
- One layer per operation. Keep cuts, engraving and scoring on separate layers with separate colors, so the laser software can give each one its own power and speed.
How the file reaches the machine depends on the cutter. McNeel's notes on preparing files for laser and waterjet cutting explain that desktop laser cutters print straight from Rhino through the Print dialog, while industrial machines read a DXF file through their own CAM software. Many of those only understand lines and arcs, so convert splines to arcs with the Convert command and export DXF with the R12 Natural scheme. Most university workshops have their own guide with the exact colors and line widths they expect, so read it before you start.
If your parts are simple slices of a form, such as waffle structures or contour models, our free tutorial on digital fabrication in Rhino shows tools that cut and lay out the sections for you. The rest of this guide covers the harder case, where the parts come from a curved 3D form.
Step 1: Flatten the Parts
Parts that come from a curved form have to be flattened before they can be cut. Rhino has three commands for this, and the right one depends on how the surface curves.
| Tool | Use it for | Result |
|---|---|---|
| UnrollSrf | Surfaces curved in one direction, such as cylinders, cones and folded plates | Exact, no stretching |
| Smash | Double-curved surfaces when an approximate pattern is enough | Approximate |
| Squish | Double-curved surfaces and meshes | Approximate, reports stretch and compression |
| Unroll inside Grasshopper | Hundreds of parts at once, kept in sync with the design | The same as UnrollSrf |
UnrollSrf is the one to use whenever you can. It works on surfaces and polysurfaces that bend in only one direction, and its Labels option puts matching numbered dots on the edges of the 3D object and the flat result, so you know which edge joins which. Spheres and other surfaces curved in two directions cannot be unrolled exactly. Smash and Squish flatten those anyway, but the result is an approximation, so check it on a test piece before you cut a whole set.
When a design has hundreds of parts, do the unrolling in Grasshopper, so that a change to the form updates every flat part. The same unroll function is available to scripts through RhinoCommon's Unroller class, which can also carry points, curves and text dots along with each part. OpenNest, the free nesting plugin, includes helper components for unrolling as well.
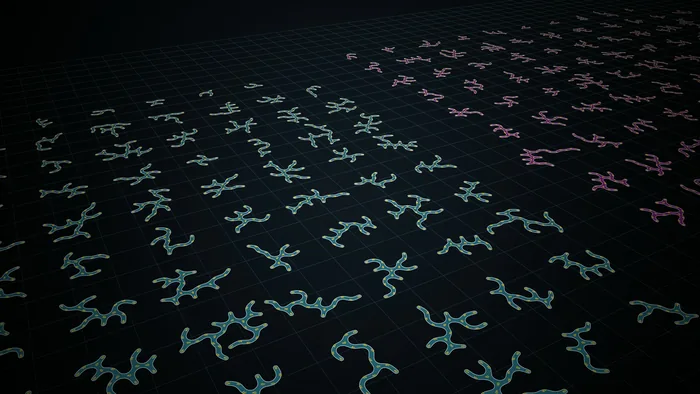
Parts of the table base after unrolling, in two colors for the two layers. Image: How to Rhino
In the workshop, every part of the table base is a mesh strip that follows the curved form. Lazar unrolls each of the 240 segments flat with our own UnrollMesh component, which the workshop introduces.
Step 2: Number Every Part Before It Leaves the 3D Model
Labeling is the step people skip, and it is the one that decides whether you can assemble the model. Give every part a number while it still sits in its 3D position. Then the same number appears on the flat part and in the 3D model, and the model becomes your assembly drawing.
- Engrave, do not cut, the numbers. Put them on the engraving layer, so the laser marks them lightly instead of cutting them out.
- Use a single-line font. Ordinary fonts are outlines, so the laser traces every letter twice. Rhino ships single-line fonts for engraving, such as SLF-RHN Architect.
- Keep the numbers away from edges and holes. A number that touches a cut line weakens the part or gets lost.
- Number the joints as well as the parts. When two parts meet at a pin or a slot, the same number on both tells you which goes where.
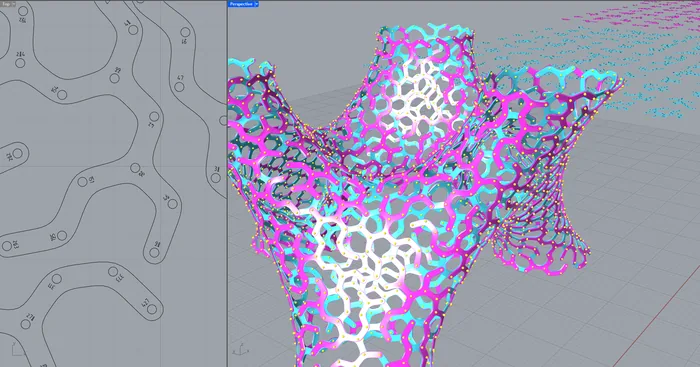
Flat parts with an engraved number next to every hole, beside the assembled base in Rhino. Image: How to Rhino
The table base takes this one step further. Every hole on every flat part gets an engraved number next to it, and the matching hole on the neighboring layer carries the same number. With 240 parts and two layers pinned together, that is the only practical way to know which connector goes where.
Step 3: Nest the Parts on Sheets
Nesting places the flat parts on sheets of material with as little waste as possible. You start with the size of your laser bed or your sheet stock and a gap between parts, and the nesting tool fits the outlines inside.
Inside Rhino, plugins such as RhinoNest do this on baked curves. In Grasshopper, OpenNest is the common choice. It is free, it nests directly inside the definition, and it takes your sheets and your part outlines as inputs. Three habits save a lot of frustration with it.
- Feed it closed outlines only. Open curves and stray text confuse the nesting.
- Nest the outlines, then move the labels with them. Keep the engraved numbers out of the nesting input and apply each part's transformation to its numbers afterward.
- Leave room for the kerf. The beam burns away a thin strip of material, usually a fraction of a millimeter. Space the parts a little apart, and if exact size matters, offset the cut lines by half the kerf you measured on a test cut.
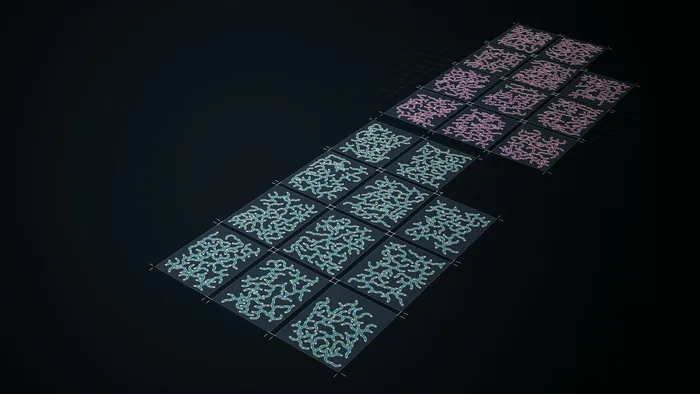
The parts of both layers nested on sheets, ready for the laser. Image: How to Rhino
Step 4: Export, Check and Test
Before the file goes to the cutter, open the exported file again and look at it. Check that the layers and colors survived, that the scale is right, and that every cut outline is still closed. Then cut one part. A test piece tells you the kerf, the power and the speed for your material, and it costs one small offcut instead of a whole sheet.
Worked Example: An Organic Table Base with 240 Laser-Cut Parts
The project from Workshop #28 is inspired by Low Table PatDef, a project by Laurent Delrieu, the creator of the Nautilus plugin, who taught our Workshop #21 on Nautilus. It shows every step of this guide on a form that is far from flat.
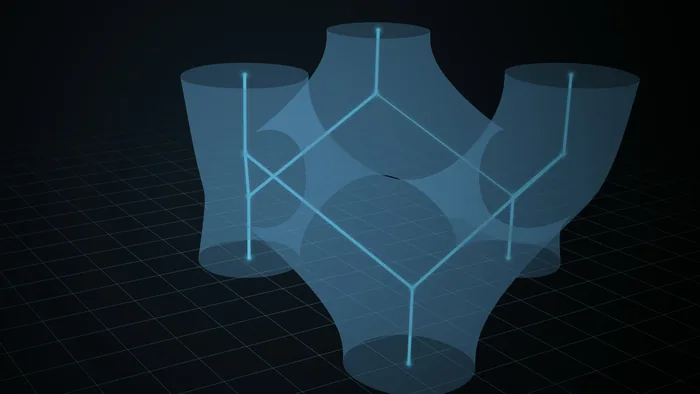
The start of the definition, with 12 lines and the smooth body built around them. Image: How to Rhino
The form starts from 12 lines. MultiPipe turns them into one smooth SubD body, which becomes a quad mesh relaxed with Kangaroo while its open edges stay fixed. The relaxed mesh is remeshed into triangles and split into 120 clusters grown from seed points, and a Kruskal maze, 1,890 lines in total, grows inside every cluster.
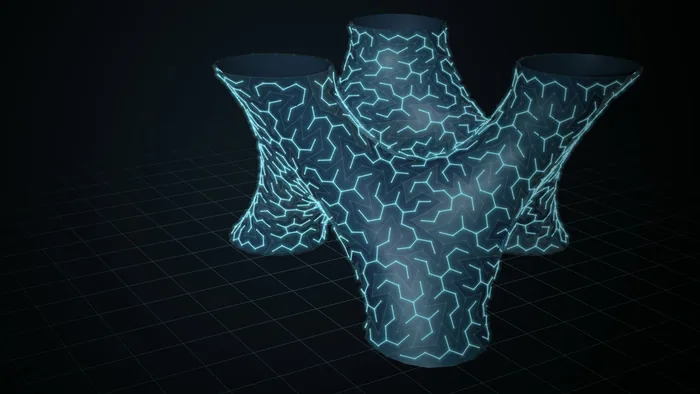
Kruskal maze lines grown inside every cluster of the relaxed mesh. Image: How to Rhino
The shape itself was the easy part. The hard part was turning the branching maze lines into strips with real thickness. The lines branch in every direction and sit on a curved surface, so two neighboring lines never lie in the same plane. Offset each line on its own, and the offsets never meet, which leaves gaps and overlaps wherever strips join.
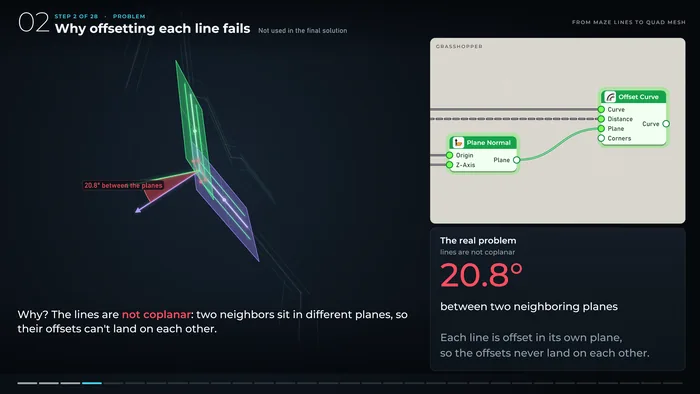
Why offsetting each line on its own fails. Neighboring lines sit in planes 20.8 degrees apart. Image: How to Rhino
The fix is to stop treating the lines one by one. Every vertex of the maze computes its corner points once, and every strip that meets at that vertex uses exactly those points, so neighboring strips connect with no gaps. The points are then pulled back onto the base mesh and joined into a clean mesh strip with rounded ends. The workshop builds this step by step, because it is the step that makes every later one possible.
A second layer with a different pattern follows, and connectors pin the two layers together. Then come the steps from this guide. Every segment is unrolled flat, every hole gets an engraved number, and all 240 parts are nested on sheets with OpenNest, with cut lines and engraving on their own layers.
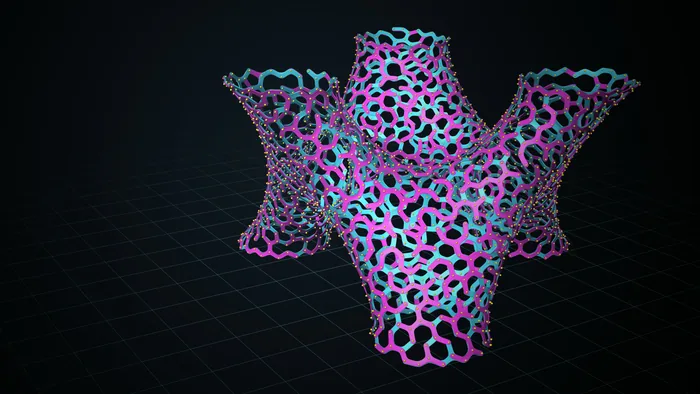
Two layers with different patterns, pinned together with connectors. Image: How to Rhino
The finished definition has almost 900 components, and it updates the whole chain when the form changes, from the base lines to the nested sheets.
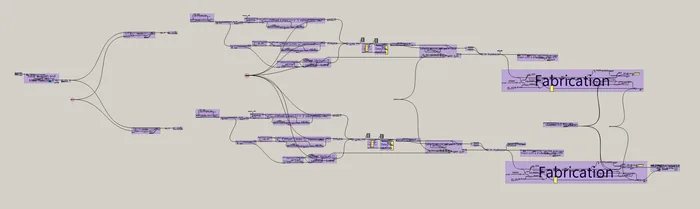
The whole definition, almost 900 components, with the two fabrication groups on the right. Image: How to Rhino
Common Mistakes
- Sending curves that are not flat or not on one plane.
- Leaving open outlines that the cutter cannot finish.
- Duplicate curves that make the laser cut the same line twice.
- Using UnrollSrf on a double-curved surface and expecting an exact pattern.
- Flattening the parts before numbering them.
- Nesting the labels together with the parts.
- Ignoring the kerf on parts that have to fit together.
- Cutting a full batch without a test piece.
Learn the Whole Workflow in Workshop #28
From Organic Shape to Fabrication was our November 2026 workshop in How to Rhino Premium. In two live sessions, Lazar Djuric builds the table base above from the 12 base lines to the nested sheets and explains the logic behind every step. The recordings stay in the Premium library.
- Format: Two live sessions on November 12 and 13, 2026, about 8 hours in total, recorded
- Software: Rhino 8 and Grasshopper with Kangaroo, plus Nautilus, Weaverbird, MeshEdit, Flexibility, OpenNest and our UnrollMesh component
- Level: Intermediate to advanced Grasshopper users
- Files: The Grasshopper definition and the Rhino file are included
All the details are on the From Organic Shape to Fabrication workshop page. If you are newer to Grasshopper, our Rhino learning roadmap shows where it fits.
Frequently Asked Questions
Can Rhino send a file straight to a laser cutter?
Yes, for most desktop laser cutters. They work like printers, so you print from Rhino with the cutter as the printer. Industrial cutters read a DXF file through their own CAM software instead.
Which file format do laser cutters need from Rhino?
DXF is the most common, and McNeel recommends the R12 Natural scheme for machines that read only lines and arcs. Many workshops also accept AI or PDF files. Check your lab's guide for colors and line widths.
How do I unroll a double-curved surface in Rhino?
You cannot unroll it exactly. Smash and Squish flatten it into an approximate pattern, and Squish reports how much the pattern stretches. For exact parts, design the form from surfaces curved in one direction, or split it into strips, as the table base does.
What is OpenNest?
OpenNest is a free Grasshopper plugin that nests flat outlines on sheets inside a definition. It takes sheets and part outlines as inputs and also includes helper components for unrolling.
How do I engrave part numbers instead of cutting them?
Put the numbers on their own layer with their own color, set that layer to engrave in the laser software, and use a single-line font such as SLF-RHN Architect, so the laser draws each stroke once.
Related Resources
- From Organic Shape to Fabrication: Workshop #28 with Lazar Djuric
- Mastering Mesh-Driven Parametric Design with Nautilus (Workshop #21)
- Digital Fabrication in Rhino: Save Hours with Automated Tools
- Best Grasshopper Plugins Every Architect Should Know
- Architectural Model Making: Materials, Tools and Techniques
Rhino for Architects Course
Give your architectural skillset a major boost with the Rhino for Architects Course. Get over 60 hours of focused training tailored specifically for architects. Master commands and techniques to model, render, and animate architectural visualizations at the highest level. Click below for more information and watch your designs come alive!