Most of what makes a render convincing is decided before you press Render. The model has to arrive in a usable state, the materials have to read at the right scale, and the light has to explain the building. If you model in Rhino, D5 Render with LiveSync is one of the quickest ways I know to get all three right.
The advice in this Rhino to D5 Render guide comes mostly from our D5 Render Bootcamp, where Andy Christoforou, who leads the Visualization and AI efforts at KPF, took a Rhino model of Villa Savoye to finished renders. We recorded it on D5 2.9 in November 2024, so where D5 3.1 changes things, I link to D5's own pages.
Key Takeaways
- Give every Rhino layer a material before you link. Without material slots, LiveSync brings the model in completely white.
- Pick one import method per project. Direct import and LiveSync read materials differently.
- Fix Rhino's mapping inside D5. Triplanar, round corners and a little grime do more for realism than any render setting.
- Light first, then judge. Put the building in sunlight, turn auto exposure off and use two-point perspective.
- D5 Lite now runs inside Rhino. Since D5 3.1 (July 2026) it is in beta for Rhino, while D5 Render handles final stills, animation and VR.
What D5 Render Is and Why Architects Pair It with Rhino
D5 Render is a real-time, GPU-based renderer for Windows. You fly through the scene and adjust materials, light and cameras while you watch the result, with a cloud library of materials, plants, people and vehicles built in.
For Rhino users the main draw is the D5 LiveSync plugin, which updates geometry, materials and cameras with no manual export or import. Andy told us the designers he works with like it because they can model and render at the same time. On Andy's RTX 3080 the first bootcamp still rendered in just over a minute, and he takes about 90% of his materials straight from D5's library. Our Rhino rendering tutorials also cover the Enscape workflow and V-Ray 6 for Rhino.
D5 Lite vs D5 Render Pro
D5 Render 3.1, released in July 2026, added D5 Lite for Rhino as a beta. Lite runs inside the Rhino viewport, with a Render Mode using real-time path tracing and an AI Mode for exploring style and atmosphere. Its settings travel with the .3dm file, and D5 Render can open the same scene for final stills, animation, VR and presentations.
D5 says there is no separate Lite subscription and that real-time rendering in the Lite viewport is free with a D5 account, with 50 free AI generations for new users. The pricing page marks Lite "Free for a Limited Time", so treat that as an offer, not a permanent tier.
| Question | D5 Lite for Rhino | D5 Render (Pro plan) |
|---|---|---|
| Status for Rhino | Beta, released with D5 3.1 (July 2026) | LiveSync supports Rhino 6.1 or later |
| Best for | Design ideation and concept decisions | Final stills, animation, VR and presentations |
| Cost | No separate subscription | $38 per month or $360 per year |
| System | Windows 10 20H2 or later, NVIDIA RTX 20-series or newer | Windows 10 1809 or later, RTX 2060 or higher recommended |
D5 Community is free for non-commercial use, with 2,100+ assets and 50 AI trial credits. Client work needs Pro, which includes 16,000+ assets, unlimited AI features and D5 Lite. Use Lite while you design and D5 Render with LiveSync for presentation images. This guide follows the second path.
Setting Up LiveSync Step by Step
- Check your hardware. D5 is Windows only, built on DirectX 12 ray tracing, and macOS is not supported. D5's quick start guide lists a GTX 1060 6GB as the minimum and an RTX 2060 or higher as recommended. For large commercial work Andy would want at least an RTX 3080, and he warned that D5 can crash when the graphics memory fills up.
- Install D5 and the plugin. Both come through the D5 Launcher, under Workflow. LiveSync supports Rhino 6.1 or later and D5 2.7 or later.
- Give every layer a material in Rhino. The next section explains why.
- Create the link. Open a new D5 project, then use the D5 LiveSync toolbar in Rhino to create a new model link.
- Keep modeling. Edits sync to D5, which keeps the materials and scene settings you adjusted there. Rhino spotlights, point lights, rectangular lights and linear lights come across too.
- Send your views as scenes. The plugin syncs Rhino named views to D5's scene list, focal length included.
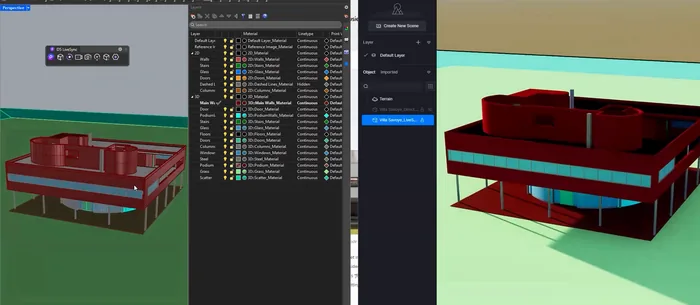
Rhino with a material on every layer, linked to D5 through LiveSync. From our D5 Render Bootcamp with Andy Christoforou.
Andy himself prefers direct import, which builds D5 materials from layer colors and names. You refresh it with Reload, or with Replace from Local after a Save As. Whatever you choose, commit to it. Direct import and LiveSync read materials differently, and reloading one with the other throws away your material work.
Preparing the Rhino Model Before You Link It
LiveSync reads Rhino's material slots, not layer colors. In concept models most layers only have a color, so everything arrives white. Andy showed this with the same Villa Savoye file. Once each layer had a material, with the objects taking it from the layer, the model came through in color and every layer could be replaced separately.
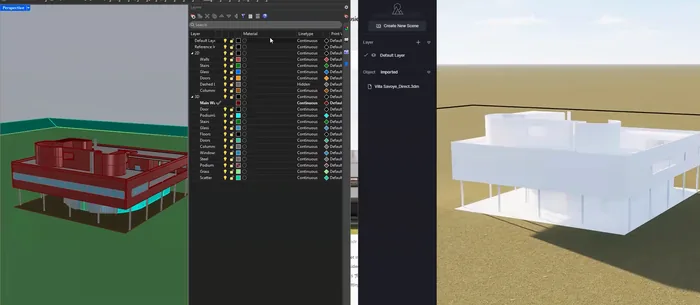
The same model with no materials on its layers arrives in D5 completely white. From our D5 Render Bootcamp with Andy Christoforou.
A few more habits help when you prepare the model:
- Split materials by layer, not by face. Model interior finishes as separate objects on their own layer instead of overriding materials in D5.
- Use loud placeholder colors. Anything still bright red in D5 is a material you have not replaced yet.
- Trim the ground. Cut footprints and paths out of ground surfaces, or scattered grass grows through the gravel.
New to Rhino? Start with our introduction to Rhino 3D modeling or the Rhino for Architects Course, which covers modeling, rendering and visualization step by step.
Materials That Read Correctly
Andy sets the sun before touching a material, because a material judged in shade reads darker than it is. Then he browses the asset library by category.
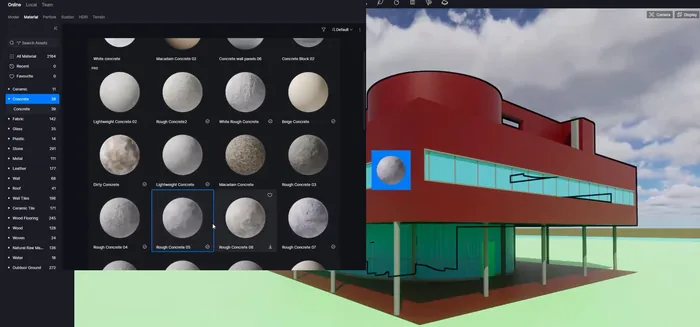
Choosing a concrete from the D5 asset library for the main walls. From our D5 Render Bootcamp with Andy Christoforou.
Rhino's UV mapping is usually the first thing to break. These settings fixed it:
- Triplanar replaces Rhino's UVs with an even, world-scale projection, and Stretch sets the size. Andy used about 0.1 to 0.5, depending on viewing distance.
- UV Randomizer hides repeats on concrete and gravel. Keep it off for brick and tile, where it breaks the coursing.
- Round Corner adds a small render-time bevel, around 2. No real edge is a perfect 90 degrees, and the light catching it is a cheap realism gain.
- Metallic is 0 or 1. Painted steel frames are 0, with roughness around 0.35 to 0.5 and specular around 0.3.
- Limit Color Bleeding stops a bright lawn from tinting white walls green.
Leave glass for last. Andy starts from D5's Normal Glass and tunes it once the trees and interior are in, when you can see what it reflects. Add grime with decals at around 50% opacity, because spotless walls give a render away.
For weak textures, Andy upscaled a low-resolution brick image with AI, made it seamless and let D5 generate the missing normal and roughness maps. D5 has since added AI PBR Material Snap, and 3.1 adds HeightField Tracing, which gives brick, stone and wood grain edge detail from a height map without subdividing the geometry. For Wright's brick and shingle, that is directly useful.
Sun, Sky and Site
Geo and Sky is a dynamic sun set by time of day and north offset. An HDRI lights the scene from an image of a real sky. Andy uses the first for precision and the second for photorealism. Three settings matter most:
- Sun disc radius. With Custom Sun on, raising it softens shadow edges. Andy called it the secret sauce of photorealism.
- Follow HDRI. Set the sun to follow the HDRI, or you end up with two suns pointing different ways.
- Sun angle. Aim for light at roughly 45 degrees to the camera. Light from behind you flattens the facade.
AI Atmosphere Match can also match the lighting to a reference image. In the bootcamp it built a new sky and set a LUT and exposure, all still editable. More options are in our list of the best AI tools for architects.
For the site, Andy used Scatter with a probability per model, a noise texture to break up the grid and a scale range around 80% to 120%. He used Brush at low density with single clicks for clusters of trees, and Path with a little random rotation, spacing and size for hedges.
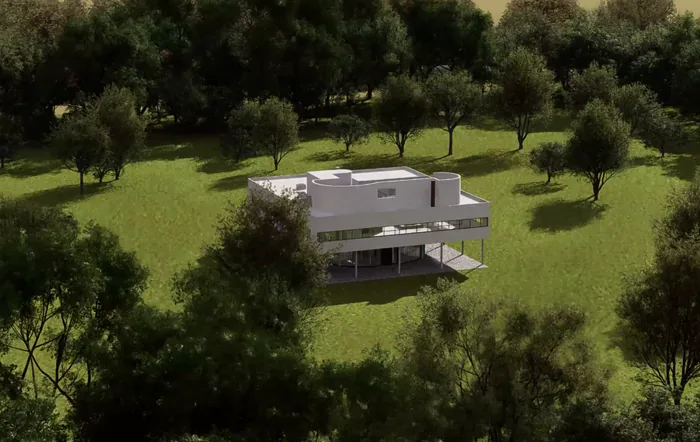
Villa Savoye's site after scattering trees and grass. From our D5 Render Bootcamp with Andy Christoforou.
Hide the horizon line with backdrop planes, a low terrain hill or light fog, and check that nothing floats. D5 3.1 also adds Seasonal Vegetation, where one date slider changes the foliage through the year.
Cameras and Composition
A D5 scene stores the camera plus layer visibility, object visibility and environment settings, so one view can exist in a day and a dusk version. Name your scenes and update them after every change, or the changes are lost when you switch.
- Two-point perspective keeps verticals vertical. Andy uses it for every architectural view.
- Focal length. Below about 15 mm, views look stretched. Andy works between 25 and 50 mm.
- Rule of thirds grid. Put the horizon and key edges on the lines, and use trees in the corners to frame the building.
- Depth of field. Focus on the facade with a blur around 7. A clipping plane removes anything right in front of the lens.
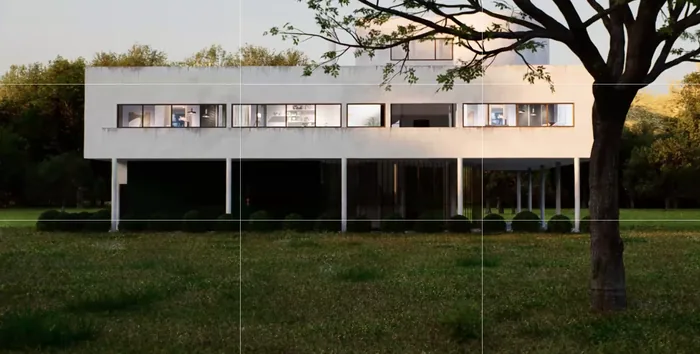
Framing a view with the rule of thirds grid and a foreground tree. From our D5 Render Bootcamp with Andy Christoforou.
Interiors with Daylight, Artificial Light and Exposure
Interiors are the hardest part, because daylight and electric light share one exposure. Turn auto exposure off first. Andy called it a gift and a curse, since it brightens the image in dark rooms and darkens it when you look outside. Then match each fixture to a light type:
- Point lights for pendants and bulbs, with an attenuation radius that limits their reach.
- Spotlights for downlights and sconces, with IES profiles from manufacturers to shape the beam.
- Strip lights for under-cabinet and cove lighting.
- Rectangular lights as large, soft fill when a room is not the focus.
Put lights on their own layer, so a scene can switch them on for dusk and off for day. For rooms seen only through glass, parallax interiors fake a furnished room on a flat plane.
Post Effects and Output
Andy keeps effects restrained. He lowers exposure slightly, adds a little contrast, keeps highlights around 0.3 to 0.4, adds a small vignette and pulls saturation down a touch, because real colors are rarely as vibrant as a fresh render.
- Render queue. Batch several scenes and override the resolution for all of them.
- Channels. Export a sky mask, material ID or transparency pass for Photoshop.
- AI upscaling. Andy leaves it off for final images because it softens detail.
- AI Enhancer. At 0.5 the pass is subtle and at 0.7 it is strong, and you can limit it to areas such as the vegetation.
- Photoshop. Andy applies a Camera Raw preset a little stronger than he wants, then sets that layer to about 50% opacity.
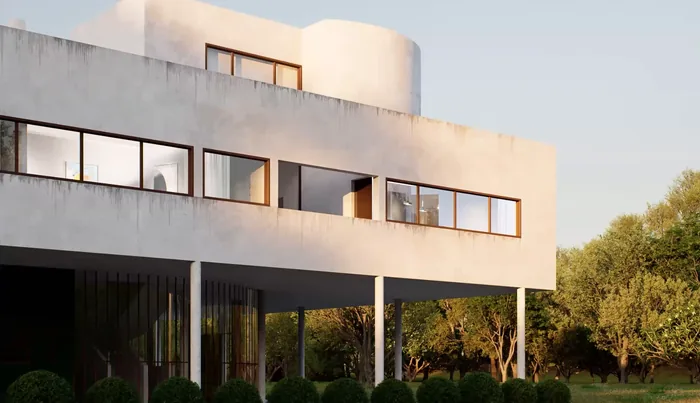
A finished still, lit with one of the D5 Studio sunset presets. From our D5 Render Bootcamp with Andy Christoforou.
Common Mistakes
- Linking a model without materials.
- Switching between direct import and LiveSync on one project.
- Judging materials in shade or with auto exposure on.
- Trusting Rhino's texture mapping instead of turning on triplanar.
- Razor-sharp edges and spotless walls.
- Forgetting to update the scene.
- Scattering everything. Dense scatter can crash D5, so save before big scatter jobs.
Learn It Live in Workshop #27, Rendering Wright
On Friday, October 16, 2026, Andy is back in How to Rhino Premium for Rendering Wright: A Rhino-to-D5 Workshop, built around one real building, Frank Lloyd Wright's Home & Studio in Oak Park, Illinois, as it stood in 1909. Wright built the house in 1889 and added the Studio wing in 1898, and the Frank Lloyd Wright Trust calls its two-story drafting room "the creative heart of the building."
Working from Andy's detailed Rhino model, you link it to D5 Render 3.1 with LiveSync, swap the placeholders for PBR brick, shingle, wood and glass, plant the site and frame a two-point perspective street view. Inside the drafting room and reception hall, you bring daylight through the windows, add lights and emissive fixtures and balance the exposure, then finish with post effects and final stills.
- When: October 16, 6 PM CEST (noon New York), about 3 hours
- Software: Rhino 8 and D5 Render 3.1. Rhino is required for LiveSync
- What to bring: A laptop that meets D5's system requirements, ideally with a recent NVIDIA RTX GPU. No D5 experience needed
- Access: Included with How to Rhino Premium, and the recording stays in the library
All the details are on the Rendering Wright workshop page. The two-day Villa Savoye session this guide draws on is our D5 Render Bootcamp.
Frequently Asked Questions
Does D5 Render work with Rhino 8?
Yes. LiveSync supports Rhino 6.1 and later, and we used it with Rhino 8. Workshop #27 uses Rhino 8 with D5 Render 3.1.
Is D5 Lite for Rhino free?
Real-time rendering in the Lite viewport is free with a D5 account, but D5 marks Lite as free for a limited time, and the Rhino version is still in beta.
Why does my Rhino model come into D5 completely white?
LiveSync reads material slots, not layer colors. Give each layer a material, let the objects take it from the layer, and sync again.
Can I run D5 Render on a Mac?
No. D5 is built on DirectX 12 ray tracing, which is Windows technology, and D5 states that macOS is not supported.
Should I use LiveSync or direct import?
LiveSync suits designers who keep modeling while they render, and direct import is simpler once the model is mostly finished. Pick one per project.
Related Resources
Rhino for Architects Course
Give your architectural skillset a major boost with the Rhino for Architects Course. Get over 60 hours of focused training tailored specifically for architects. Master commands and techniques to model, render, and animate architectural visualizations at the highest level. Click below for more information and watch your designs come alive!