If you search "Rhino vs Revit" online, you will find dozens of articles that line up features side by side and try to declare a winner. But here is the truth that most of those articles miss: Rhino and Revit are not the same type of software. Comparing them directly is like comparing apples and oranges. Yes, they are both fruit, and yes, they are both used in architecture. But they serve fundamentally different purposes at different stages of a project.
Understanding this distinction is critical for any architect or architecture student. Once you understand when and why to use each tool, the "Rhino vs Revit" debate disappears entirely. The real answer is that you should learn both, because together they give you a complete workflow from early design concepts all the way through construction documentation.
In this article, we will explain exactly how these two tools differ, where each one excels, and how they work together through Rhino.Inside.Revit to create a seamless architecture pipeline.
The Fundamental Difference: Design Tool vs BIM Tool
Before we compare any specific features, you need to understand the core difference between these two programs.
Rhino is a design phase software. It is built for creating ideas, exploring forms, testing spatial arrangements, iterating on layouts, and developing the architectural concept. Rhino's strength is speed, flexibility, and geometric freedom. You can model virtually anything in Rhino, from simple massing studies to the most complex curved geometries imaginable. It is the tool you use when the design is still evolving and you need to move fast.
Revit is a construction documentation software. It is a Building Information Modeling (BIM) platform built for the later stages of a project: developing the design into a fully documented building with walls, floors, structural systems, MEP systems, schedules, quantities, and construction drawings. Revit's strength is data management, coordination, and documentation output. Every element in a Revit model carries information (material, cost, fire rating, manufacturer) that feeds into schedules, calculations, and deliverables.
This is why architectural companies typically use Rhino in the early design phases and Revit in the later construction phases. They are not competing tools. They are complementary stages in the same workflow.

The Design Phase: Where Rhino Excels
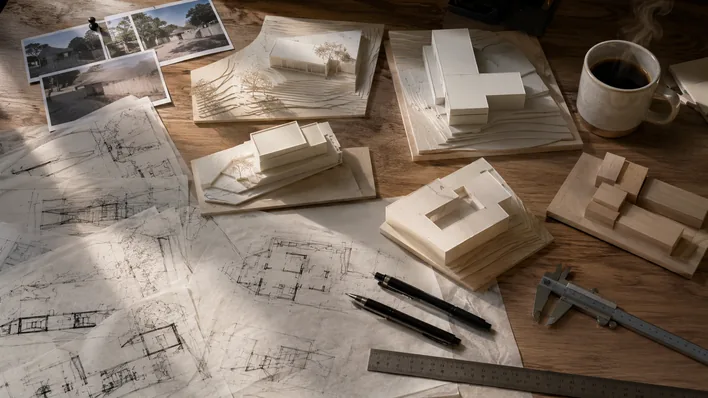
In the early stages of an architecture project, you are generating ideas. You are sketching massing options, testing different spatial organizations, exploring facade systems, and iterating rapidly on the overall form and layout. This is where Rhino is dramatically more efficient than Revit.
In Rhino, you can:
- Iterate 10x faster. Creating a massing study, adjusting proportions, testing a new roof form, or reorganizing a floor plan takes a fraction of the time it would in Revit. Rhino does not force you to define every element as a specific building component. You model freely with curves, surfaces, and solids.
- Explore multiple design options simultaneously. You can quickly duplicate a scheme, modify it, and compare five different approaches in the time it would take to develop one option in Revit.
- Work with any geometry type. Rhino supports NURBS surfaces, SubD (subdivision) surfaces, meshes, and polysurfaces. This geometric flexibility means there is no form you cannot create.
- Move from 2D to 3D fluidly. Start with a plan sketch, extrude it into 3D, sculpt the form, and refine the details, all within the same environment with no rigid constraints.
People who try to do early-stage design exploration in Revit often find themselves fighting the software. Revit wants you to place walls, define floor types, and assign properties before you have even decided on the building's shape. That level of specificity is counterproductive during the conceptual phase. Rhino lets you think about architecture first and technical details later.
Complex Geometry: SubD Tools and Organic Forms
This is where the gap between Rhino and Revit becomes enormous.
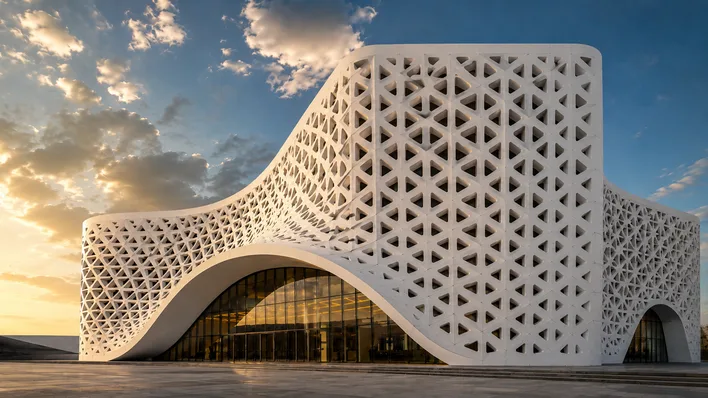
If you want to create a curvy, organic design, something inspired by the work of Zaha Hadid, MAD Architects, or BIG, doing this in Revit is extremely difficult. It is not impossible, but it requires advanced workarounds, adaptive components, and a level of Revit expertise that most users simply do not have. And even then, the result is often geometrically imprecise and painfully slow to modify.
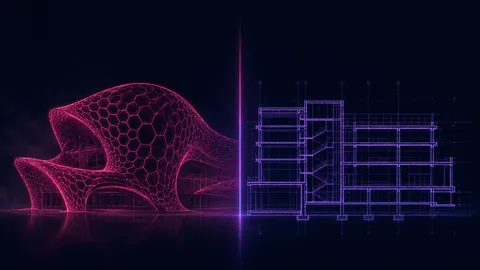
In Rhino, creating complex curved forms is natural and efficient. Rhino's SubD (Subdivision Surface) tools allow you to sculpt smooth, organic shapes by manipulating a lightweight control cage. Think of it as working with digital clay, but with architectural precision. You push and pull vertices, edges, and faces to shape the form, and Rhino maintains perfectly smooth surfaces throughout. SubD tools make it possible to design flowing facades, sculptural canopies, complex roof structures, and freeform pavilions in minutes rather than hours.
Beyond SubD, Rhino's NURBS modeling engine gives you mathematically precise curves and surfaces that are smooth at any zoom level. There are no faceted edges, no polygon approximations. When you design a curved curtain wall in Rhino, it is a true curve, and it exports cleanly to fabrication tools, rendering engines, and (via Rhino.Inside.Revit) directly into your BIM model.
The bottom line: if your design involves anything beyond straight walls and flat roofs, Rhino will be 10 times more efficient than Revit for developing that geometry.

The Documentation Phase: Where Revit Takes Over
Once the design is finalized, once you have settled on the form, the spatial organization, the structural approach, and the key details, that is when Revit takes over.
Revit is a BIM (Building Information Modeling) platform, which means every element in your model is not just geometry but also data. A wall in Revit is not just a 3D shape. It knows its material composition, its fire rating, its thermal performance, its cost, and its relationship to the floor below and the ceiling above. This data is what makes Revit indispensable for:
- Construction drawings: Floor plans, sections, elevations, and details that update automatically when you change the model. In Rhino, you would need to manually create and maintain 2D drawings.
- Material schedules and quantities: Revit can generate a complete table of every material in your building, with quantities and specifications. This is essential for cost estimation and procurement.
- Coordination with engineers: Structural engineers, MEP engineers, and other consultants work in Revit (or compatible BIM tools). A Revit model enables multi-discipline coordination and clash detection.
- Regulatory compliance: Many building authorities and clients now require BIM deliverables. Revit models can be exported as IFC files for code compliance checks and facility management.
Rhino does not have these BIM capabilities natively. You cannot generate construction drawings from a Rhino model in the way that Revit does. You cannot schedule materials, manage building data, or coordinate with engineering disciplines directly in Rhino. This is not a weakness of Rhino because Rhino was never designed for this purpose. It would be like criticizing a sports car for not being a pickup truck.

Grasshopper vs Dynamo
Both Rhino and Revit have visual programming environments: Grasshopper for Rhino and Dynamo for Revit. These tools share a similar concept (node-based parametric design), but in practice, Grasshopper is significantly more capable.
Grasshopper advantages over Dynamo:
- More user-friendly interface. Grasshopper's canvas is smoother, more responsive, and easier to organize. Complex definitions with hundreds of components remain manageable.
- Massive plugin ecosystem. Grasshopper has hundreds of plugins available through Food4Rhino, covering environmental analysis (Ladybug/Honeybee), structural optimization (Karamba), physics simulation (Kangaroo), mesh modeling (Weaverbird), and much more. Dynamo's package ecosystem is considerably smaller.
- Larger community and more learning resources. Grasshopper has a vibrant global community with forums, tutorials, courses, and thousands of shared definitions. Finding help, examples, and documentation for Grasshopper is much easier than for Dynamo.
- Greater geometric freedom. Because Grasshopper works within Rhino's modeling engine, it can generate any geometry type: NURBS, SubD, meshes, points, curves, and surfaces. Dynamo is constrained by Revit's geometry engine, which is more limited when it comes to complex forms.
Dynamo's advantage is that it operates directly within Revit, so it can manipulate BIM elements, read and write parameter data, automate documentation tasks, and create Revit families programmatically. For automating repetitive Revit tasks (renumbering rooms, placing elements by spreadsheet data, batch-modifying parameters), Dynamo is the right tool.
But for parametric design and form generation, Grasshopper is in a completely different league. If you want to create a parametric facade, an optimized structural grid, or an environmentally responsive building envelope, Grasshopper is the tool for the job. For a full feature-by-feature breakdown, see our dedicated Grasshopper vs Dynamo comparison.
The Bridge: Rhino.Inside.Revit
Here is the best part: you do not have to choose between Rhino and Revit.
Rhino.Inside.Revit is a plugin that lets you run Rhino and Grasshopper directly inside Revit. This means you can use Rhino's superior modeling tools and Grasshopper's parametric capabilities to create complex geometry, and then push that geometry directly into your Revit model with proper BIM categories, parameters, and family assignments.
This is how leading architecture firms handle the design-to-documentation transition:
- Design phase: Develop the concept in Rhino. Explore forms, iterate on layouts, test options freely.
- Parametric development: Use Grasshopper to refine parametric elements (facade panels, structural grids, complex surfaces).
- BIM integration: Use Rhino.Inside.Revit to transfer the finalized geometry into Revit with all necessary BIM data attached.
- Documentation: Complete the construction drawings, schedules, and coordination in Revit.
This workflow gives you the best of both worlds: Rhino's design freedom and speed in the early phases, and Revit's documentation power in the later phases. No compromises, no workarounds, no fighting the software.

Learning Curve
Both Rhino and Revit have significant learning curves, but they are different in nature.
Rhino's learning curve is about mastering a flexible, open-ended toolset. Rhino gives you hundreds of commands and complete geometric freedom, which can feel overwhelming at first. But once you learn the core modeling concepts and build your keyboard shortcut workflow, Rhino becomes incredibly fast. The payoff is that you can model anything once you are proficient.
Revit's learning curve is about understanding a rigid, rule-based system. Revit has strict ways of doing things: wall types, floor types, family categories, view templates, schedules. Learning Revit means learning its rules and conventions. The payoff is that once you understand the system, documentation output is highly automated.
For architecture students, we recommend learning Rhino first. The design skills you build in Rhino (spatial thinking, 3D modeling, form development) are transferable to any software. Revit's documentation skills are important but more procedural, and they are easier to pick up once you already have strong 3D modeling fundamentals. Many firms expect junior architects to know Rhino for design and then learn Revit's documentation workflow on the job.
Pricing
Rhino 8 costs a one-time fee of $995 (around $195 for educational licenses). No subscription, no annual renewals. You own the license permanently. Grasshopper is included for free.
Revit is available only through an Autodesk subscription at $3,575/year (or as part of the AEC Collection at $4,745/year). For students, Autodesk offers free educational licenses valid for one year.
The pricing difference is significant. A five-year cost comparison: Rhino costs $995 once (plus an optional $595 upgrade). Revit costs $17,875 over five years. For independent architects, small firms, and students transitioning to practice, Rhino's one-time pricing is dramatically more accessible.
That said, most architecture firms already have Revit licenses because BIM deliverables are standard in the industry. The pricing question is more relevant for personal licenses and small practices where Rhino's affordability is a major advantage.
Should You Learn Both? Yes.
The honest answer to "Rhino vs Revit" is: learn both.
Architects who know only Rhino miss out on the documentation and BIM coordination capabilities that firms need for construction. Architects who know only Revit miss out on the design freedom, speed, and parametric power that make early-stage design exploration productive and creative.
The strongest architects in the job market today are those who can design in Rhino, develop parametric systems in Grasshopper, and deliver documentation in Revit. This combination covers the entire architecture project lifecycle from competition sketch to construction drawing.
If you are deciding where to start, start with Rhino. The 3D modeling skills, spatial thinking, and design intuition you develop in Rhino will make you a better designer regardless of what documentation tool you use later. And with Rhino.Inside.Revit, your Rhino skills translate directly into your BIM workflow.
Here is the summary of where each tool fits:
- Design exploration and iteration: Rhino
- Complex and organic geometry: Rhino (SubD + NURBS)
- Parametric design: Grasshopper (within Rhino)
- Construction documentation: Revit
- Material schedules and quantities: Revit
- Multi-discipline coordination: Revit
- Design-to-BIM bridge: Rhino.Inside.Revit
- Better value for money: Rhino ($995 one-time vs $3,575/year)
Stop thinking of it as Rhino or Revit. Think of it as Rhino and Revit, each doing what it does best.
If you are interested in learning Rhino, we have a dedicated step-by-step course called the Rhino for Architects Course. It covers over 60 hours of training from 2D drafting and complex 3D modeling to rendering and animation, all with architecture-specific projects and workflows. Over 887 students have already gone through the course, and it is designed to take you from complete beginner to a confident Rhino user. Once you have Rhino down, picking up Revit for the documentation side becomes much easier because you already understand 3D modeling, spatial thinking, and design logic.
Related Resources

Rhino for Architects Course
Give your architectural skillset a major boost with the Rhino for Architects Course. Get over 60 hours of focused training tailored specifically for architects. Master commands and techniques to model, render, and animate architectural visualizations at the highest level. Click below for more information and watch your designs come alive!