What does a perfect Grasshopper tutorial look like? And more importantly, what is the best way to start learning Grasshopper if you never used it before? Well, today we're going to find out. Let's dive in!
Grasshopper Tutorial Introduction
Since you're here, you've probably heard of Grasshopper and you're interested to know more about it. However, if this is your first time hearing about it, before going forward, I suggest you read our Grasshopper 3D Guide for parametric modeling.
This is going to give you all the background needed to understand why this software is becoming so popular in all design industries, especially architecture and what are all the benefits of using it. Then, you'll be ready for the next step and that is - watching and learning with a structured step-by-step Grasshopper tutorial like this one.
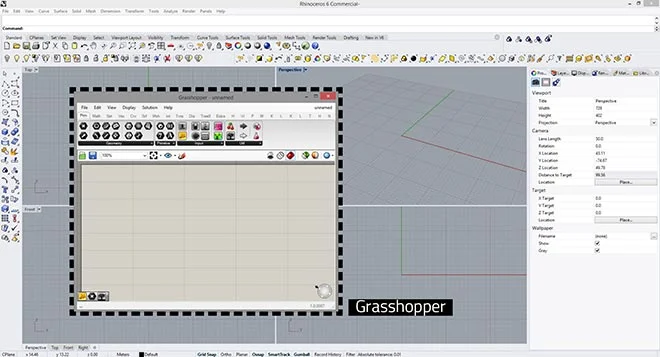
All right, so first let's start by activating Grasshopper. Once you open Rhino, simply type "Grasshopper" in the command line and click enter.

This will activate the command and the Grasshopper window is going to load. Keep in mind that if you have one monitor, you may need to resize the window a bit to be able to see clearly both Rhino's viewport and Grasshopper's interface as well because oftentimes you would reference the geometry back and forth between Rhino and Grasshopper.
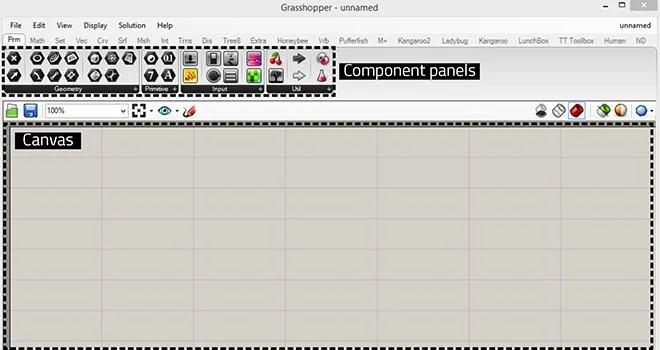
Now, let's take a look at Grasshopper's interface. The two most important parts of the interface are component panels and a big blank canvas. Component panels are the holders of the individual Grasshopper components and often times they are organized in groups based on the specific type of components.
For example, here we can see a Primitive component panel that holds geometry, primitive, input, and utility components.
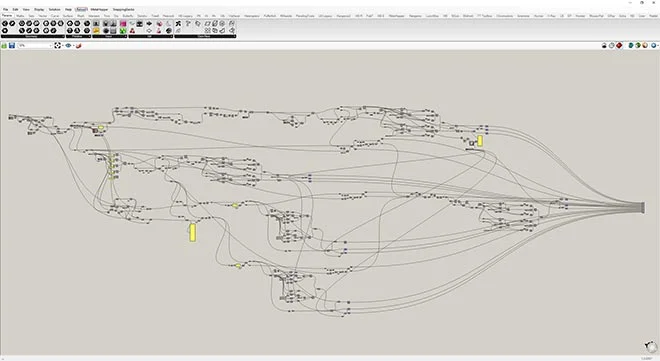
Grasshopper canvas is a place where we create the parametric algorithm or so-called "Grasshopper definition". This is the place where we put all the components and interact with them. Think about the canvas as a big infinite piece of paper where we make or break our scripts.
And, this is one of the reasons why Grasshopper is so popular and "user-friendly" because even users who never coded before can interact with the code in a graphical way.
I intentionally put quotation marks because for someone who never had experience with these kinds of applications, even this user-friendly interface may not be enough and that's why we're here to clarify the information with this grasshopper tutorial as much as we can.
Adding Files to Grasshopper
Grasshopper files have a .gh file extension and in order to import or open it, you can either click on that small green folder icon or you can simply drag the file from Windows Explorer and drop it onto the canvas. Depending on the file size, it will either load instantly or it would take a couple of seconds.

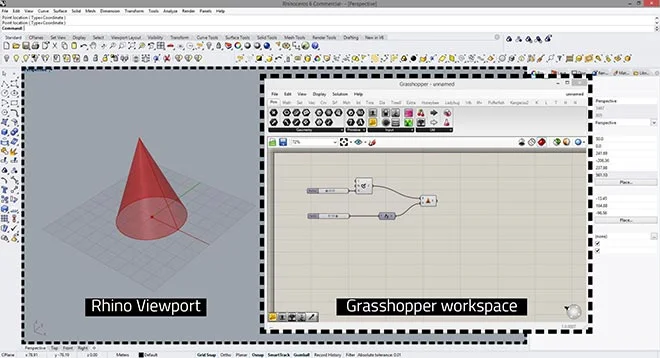
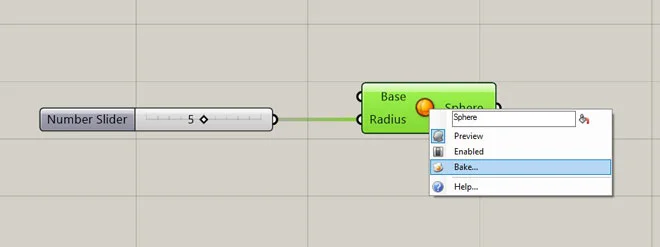
Once the file loads up, you'll notice a couple of components on the canvas and you'll be able to see the representation of that geometry in the Rhino viewport. Keep in mind that this geometry is not editable in Rhino yet. It only shows the result of the Grasshopper script.
In case you'd like this geometry to be editable in Rhino, you would need to do a process called "baking". This process is quite simple, all you need to do is right-click on the last component and click on an icon that looks like a sunny-side-up egg and then you just select the Rhino layer where you want this geometry to be created.
Placing components on Grasshopper canvas
There are a couple of ways we can add a component to Grasshopper Canvas. Let's start with the first one.
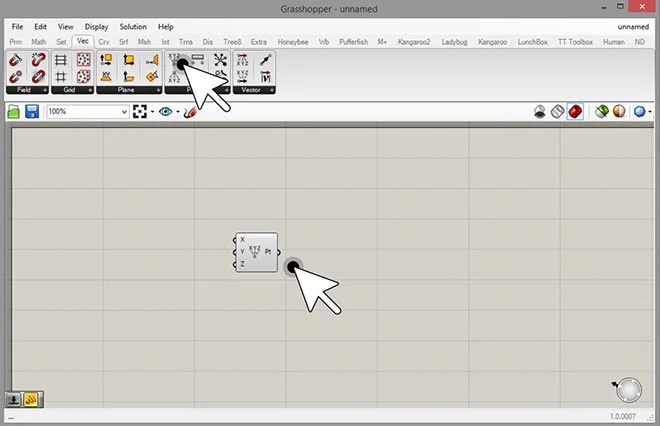
It starts with choosing a component you want to place. Just use the left click once to select the component and then go to Canvas and use the left click once again to position it exactly where you want.
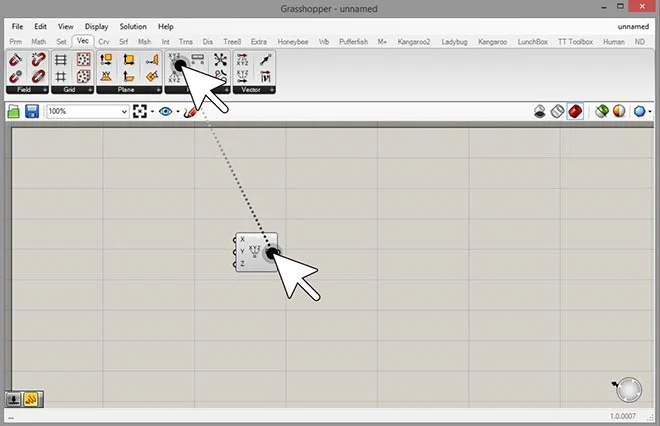
The second option starts the same way, you select the component with the left click, but this time instead of clicking on the canvas for the second time, we keep the left mouse button pressed and we drag the component in place.
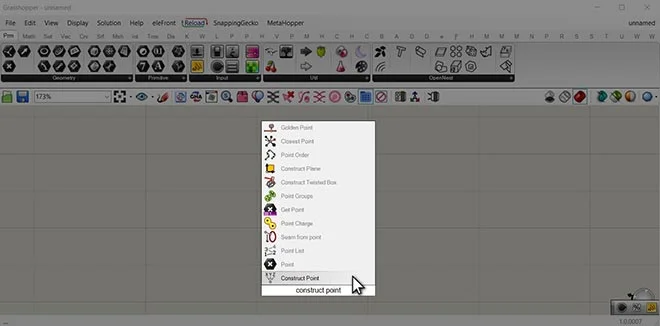
The third option is to double-click on the canvas and as soon as you do this, you'll get a small pop-up box where you can simply type the name of the command with your keyboard.
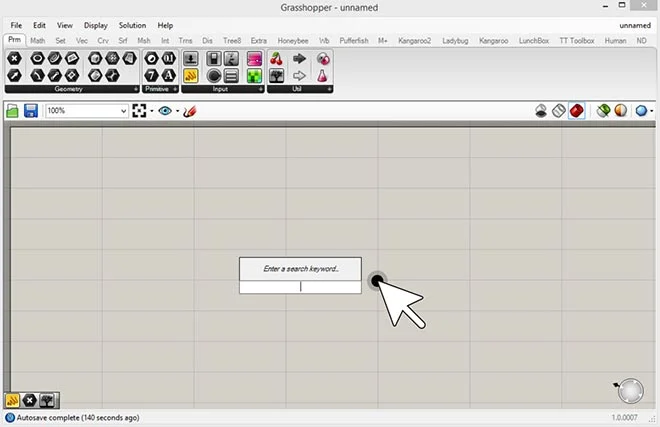
For example, we can type "construct point" and all of the commands that start with the same letters will appear and our desired command will be the closest. Then we can simply select it and it will be placed on the canvas.
Grasshopper components attributes
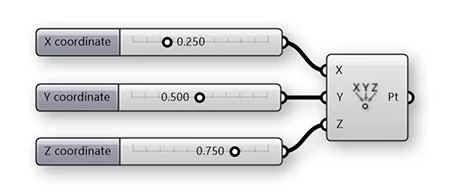
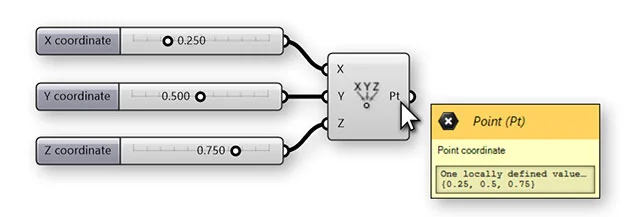
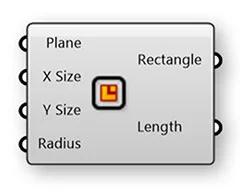
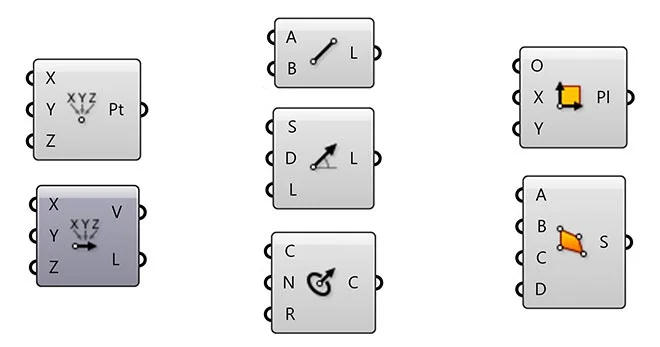
Now, let's see what are the specific attributes of a Grasshopper component. Starting from the left side we have inputs. This particular component has 3 inputs: X, Y, Z but we have many different types of components, some with fewer, and some with more inputs.
X, Y, Z values in this case would be numbers that would represent the 3 coordinates of a single point in the coordinate system.
The middle part is a component name. You can see that in this example we have an icon, but this representation depends on the display settings of the components. More about this in just a bit…
The last part is called the output. This is the end result of a certain component. In this example, we used 3 inputs (3 coordinate values x,y,z) to construct a point, so the output value is a point with these coordinates.
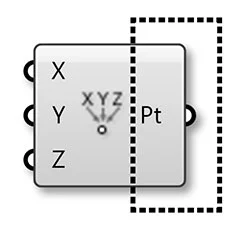
Now we can use this point for something else in our script and we can interactively change the initial input parameters.
If you want to examine the inputs or the outputs, you can simply hover with your mouse over the desired segment, and you'll be able to see what is inside of those data containers. This is a great way to troubleshoot if something doesn't work as intended with your component.
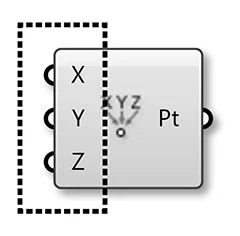
Now, let's come back to those component settings I mentioned earlier. There are a couple of ways to visually represent a component. We have two main options: Draw Icons and Draw Full Names. These are located in the menu bar of the Grasshopper window under Display.
The default options that we had in the previous examples were Draw Icons - checked and Draw Full Names - unchecked.

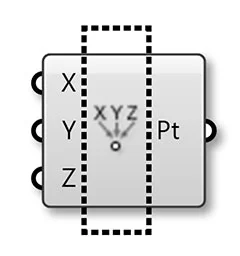
When you have Draw Icons - unchecked and Draw Full Names - checked, you will get the following representation of the component.
And then, you can also make combinations, for example, I personally like to see the full names of the components and I also like to see the icon. In that case, the component would look like this.
But again, this is a matter of personal preference and organization. The drawback of full names is that your definition would be quite lengthy as it will take more space on the canvas, but this doesn't really matter in terms of the performance or anything like that.
Component statuses
Grasshopper components can have multiple statuses which depend on various factors, so let's examine what they are and how to recognize them.
This is a component with a valid or correct status. It means that it contains the correct data type and once you click on the component, the geometry will be visible in red color in Rhino's viewport.
The next status is called hidden. You will notice that the component itself has a slightly different grayish color(a bit darker gray) and the main attribute here is that the geometry is not visible in the Rhino's viewport once you click on it.
Sometimes, you would want to hide a component like this in order to see what's going on with the other segments of the script.
Then we have disabled status. Once you disable the component, it doesn't output any data and it doesn't perform any actions. You have the ability to enable and disable a component if you just right-click on it and usually, you would want to disable it if you need to fix something in the script or if you want to diagnose a potential problem. Sometimes, even to save computing time while working on a separate part of the script.

This is the selected status. You will be able to see this when you click on the component and if it already has the correct status, you'll see it exactly like this. At the same time, the selected geometry in the Rhino's viewport will also be in green color.

This way you can pick and choose different components and see the exact geometry they represent in Rhino. On the other hand, if you select the component that's disabled, it will appear in a darker green color, but you won't be able to see that geometry in Rhino because it was disabled initially.
The orange color means represents the warning status. This means that the component doesn't contain any data and it will not be able to execute its function. In this particular example, that means that the point component won't create any points because it doesn't have any input data.
The last one is error status. When you see a component in red color, it means that it contains the wrong data type. For example, the input parameter is expected to be a number, and instead of placing a number, we put text, which would result in an error.
Component Types
Now, let's see what are some of the most common component types in Grasshopper. Based on the general function that they are doing, we can divide all components into 3 big groups:
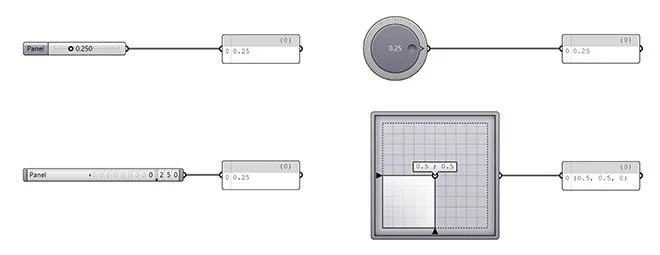
- Inputs or input components. We use these to provide information, numbers, text, and other data types which are essential for the grasshopper script to work. On the image below, you can see a couple of different input types like number slider, digit scroller, control knob, 2D slider and these are some of the few that are most common.
- Parameters or data containers. We use these whenever we want to select some geometry type that already exists in our Rhino window like a point or a curve. Sometimes we can use this only to pass through data to another input in our Grasshopper script. Again we have many different types of data containers like point, vector, circle, line, mesh, surface etc.
- General components. This is the most common component type has both the input part and the output part. If you take a look at any grasshopper definition, you may notice that input components and data containers are usually on the left side of the definition and the final output would be a general component that's on the far right side. That's the one that usually gets baked into Rhino as a final result.
Data storage and wire types
We have a couple of different data storage types based on complexity and also different types of wires that carry that information. They are all specific and in the following examples, you can see the visual difference. We can generally divide them into:
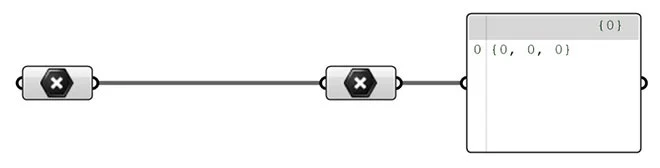
- Single value. We have only one string of information representing the coordinates of a single point. That's why it's a single value and the representation of the wire is a regular gray curve.
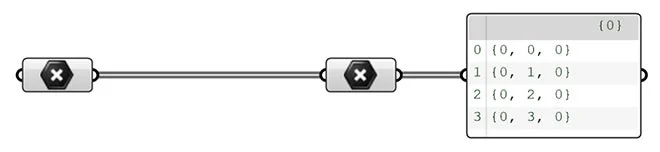
- List contains multiple values of the same data type. You can see that we have 4 points with their x,y,z coordinates. The wire is thicker with defined edges which means that it's carrying multiple values.
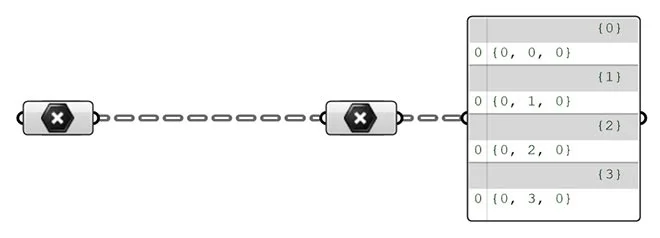
- Data Tree is the most complex data storage type. It contains multiple branches that carry data inside of them. Each branch can be a separate list on its own or it can be a single value. The wire display is a dashed line. In this example, we have 4 different branches and each branch has one single input.
Manipulating wires and Grasshopper components
All right, now that we understand the types of wires and components we have, let's see what steps we need to know in order to connect individual components together, so they get the input data correctly.
First, we're going to cover how to plug a wire. We need to go from left to right always. We start with the left-click at the end of the slider component, then drag the mouse to the input side of the construct point component and release the mouse.
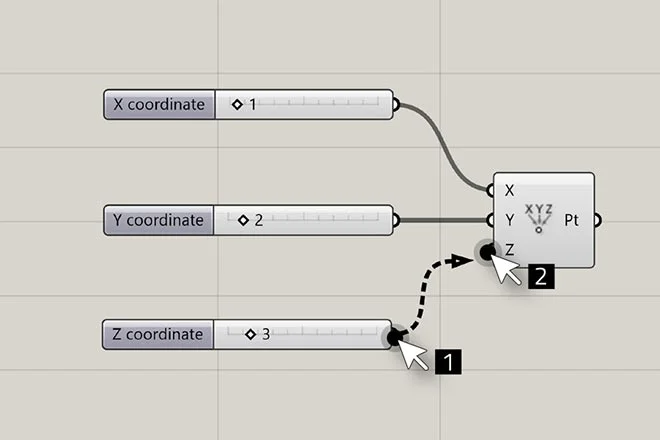
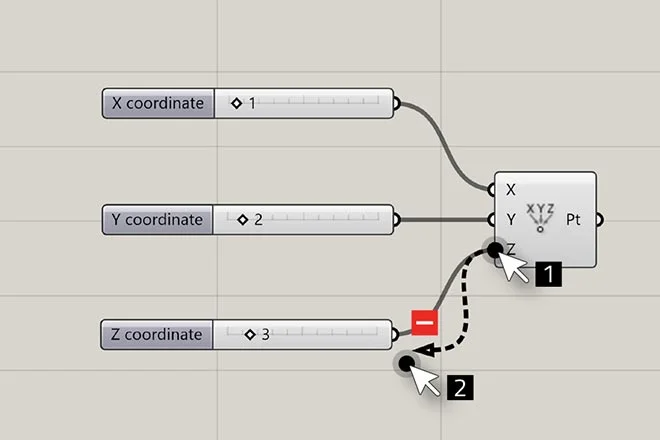
If you want to unplug a wire, the procedure is similar, but it involves holding a CTRL on your keyboard and going from right to left instead. So, hold CTRL, then left-mouse click on the Z value and drag the mouse to the Z coordinate slider. A small minus sign will appear which means that the wire will get unplugged.
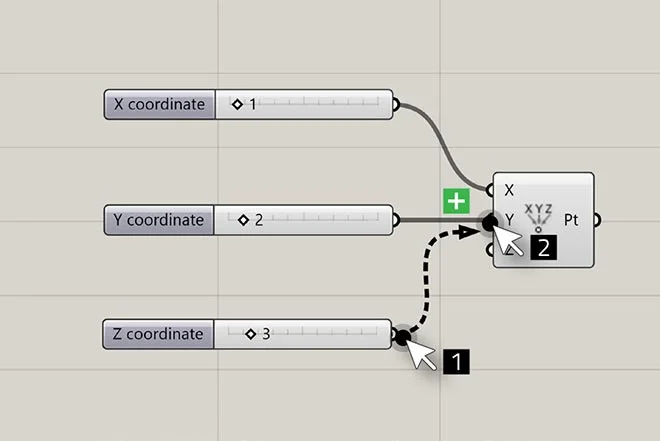
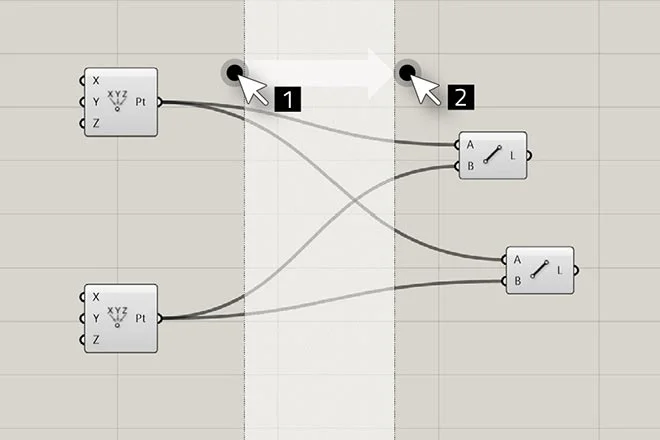
We can also add a wire to the existing data slot. In order to do this, we go again from left to rhino. The first thing is to hold the SHIFT button + left mouse click at the end of the slider component and drag it to the Y input of the construct point component. This way, we added two numbers in the same Y slot.
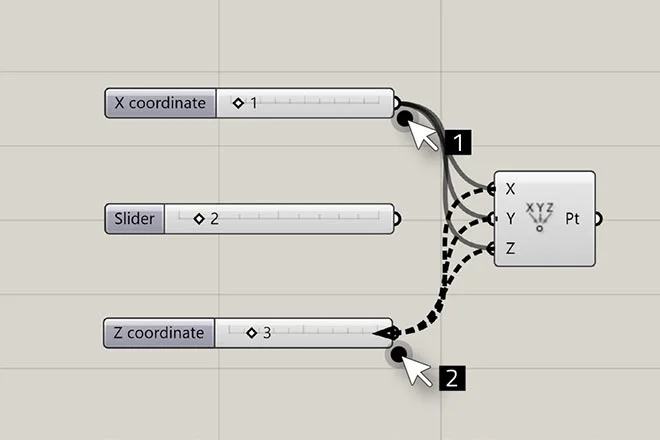
Another action we can do with wires is to re-plug wires. Sometimes, you may want to modify all the inputs at once, so instead of unplugging and plugging them one by one, we can re-plug all of them at the same time.
All you need to do is hold CTRL + SHIFT and use the left click to drag the values from one slider to the other. This way all of the wires will attach together at the same time.
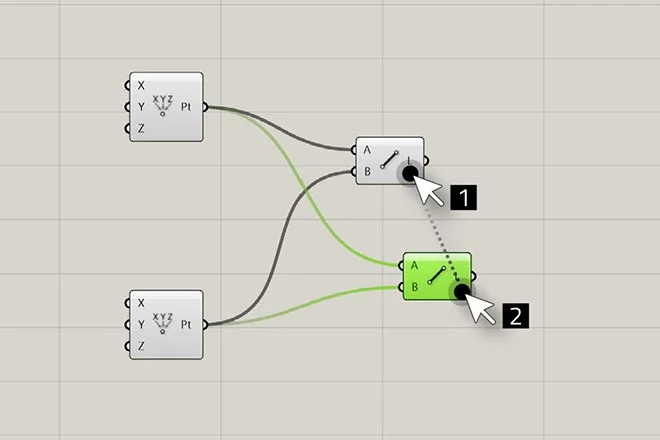
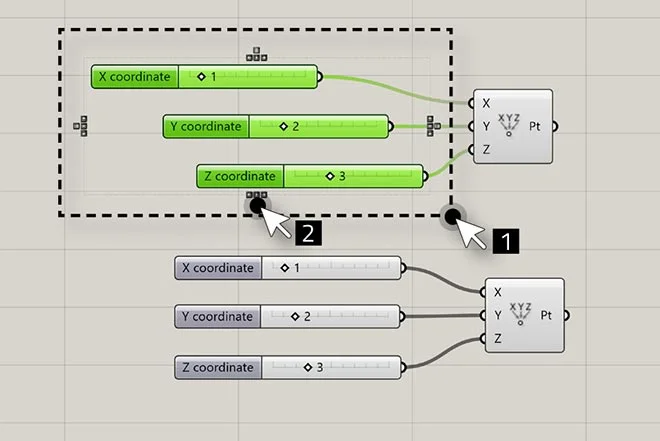
Let's see how we can copy a component with wires and maintain their connections. In order to do this we simply need to select the component we want to copy, drag it to a new position and then tap ALT key on the keyboard. This will create a new copy and maintain the properties of the wires associated with the copied component.
Grasshopper scripts can get crowded, especially if you have lots of different types of components. In some cases, you would need some extra room on your canvas and that's when we can create insert horizontal space on the canvas.
In order to do this, we need to hold the ALT key, left-click on the canvas, and then drag to the right and release the click. That's how we can create some extra space for our components.
If you prefer to have your scripts neat and organized, you definitely want to know how to align components. Having organized scripts is important especially if you're working with a team of designers who are also going to use your file.
In order to align the components, just select multiple components at the same time by making a window around them, and as soon as you do that you'll be able to see a dashed rectangular line around the components with align options available in the middle of rectangle edges. Here you can choose whether you want to align the components to right, left, up, down, or center.
Another very useful feature is the ability to group components. This is simply done by selecting the components that you want to group, then right-click anywhere on the canvas and left-click on the Group.

Grasshopper tutorial finished - what should I do next?
All right, so if you've come this far in this Grasshopper tutorial, you're probably wondering where should I go next and how should I continue learning Grasshopper from here.
First, you can download this Grasshopper Guide in the PDF format, so you can come back to it any time in the future.
However, If you're interested in more interactive Grasshopper tutorial in a video format that's going to show you how to start creating your own scripts as soon as possible, I would invite you to check out our Rhino for Architects Masterclass. It's around 45-min long video that gives you much more information about how Grasshopper and Rhino can be used in architecture. It's a step-by-step straight to the point tutorial that we are sharing for free.

However, if you're serious about learning Grasshopper and you want to commit to a structured online training instead of a Grasshopper tutorial like you found on this page, we have developed Grasshopper Complete Course that's going to take you from a complete beginner to an advanced level in Grasshopper.
We put a lot of time and effort in creating this training with over 60 hours of video material where we covered all possible components in Grasshopper through architectural examples and practical use-cases.
We covered the creation of 10 highly complex projects in detail and our main goal was to show you that anyone can learn Grasshopper with the right learning approach, resources and the right tutor.

More than 600 architects have successfully finished our training and are not proficient in Rhino and Grasshopper. You can check out our students' experiences yourself, their projects and how far they've come since they went through our Rhino and Grasshopper tutorial materials.

Final Thoughts
I hope this Grasshopper tutorial gave you some initial insights about how visual scripting works. Now it's your time to decide if and how you want to continue with Grasshopper. We have created a lot of interesting Rhino and Grasshopper Tutorial Videos, and yes, these are completely free!
You can check them here on our website or on our YouTube channel. Good luck and happy learning!
Dušan Cvetković